Printing Tanks

A Matilda to start with….

A picture of how it came off the plate.

You can really see the support network to help it print properly. I have always printed it vertically before (like the turret). This is the first time on the tracks and to be honest, there is less chance of it getting knocked over, the down side is a lot more waste.

Here you can see the stuff that has been pulled away from both bits…weight wise not really very much, it just adds to the time required.

And finally… here she is all trimmed up and ready for a run into the paint shop.

I am printing off a CharB just now with a Somua to follow.

To be honest I don’t know what theatre of operations or date to go for. At the cost of these I can print of a fair few different ones and see what catches my fancy.

I did consider the desert war. The advantages are that I have some palm trees etc as well as some 6mm buildings. I also have a terrain mat and some desert style hills.

I reckon I can print some 15mm buildings and off I go!

Dark Future… Mechanical November ‘18

Azazel does a great community challenge each month. The idea is to get people painting. November’s challenge was something mechanical. Not something I would normally bother with, but in all honesty,  as it was a challenge I decided to give it a go. I had a mooch about for anything mechanical. The options I found were:

6mm road wars vehicles

10mm Gatling gun and crew

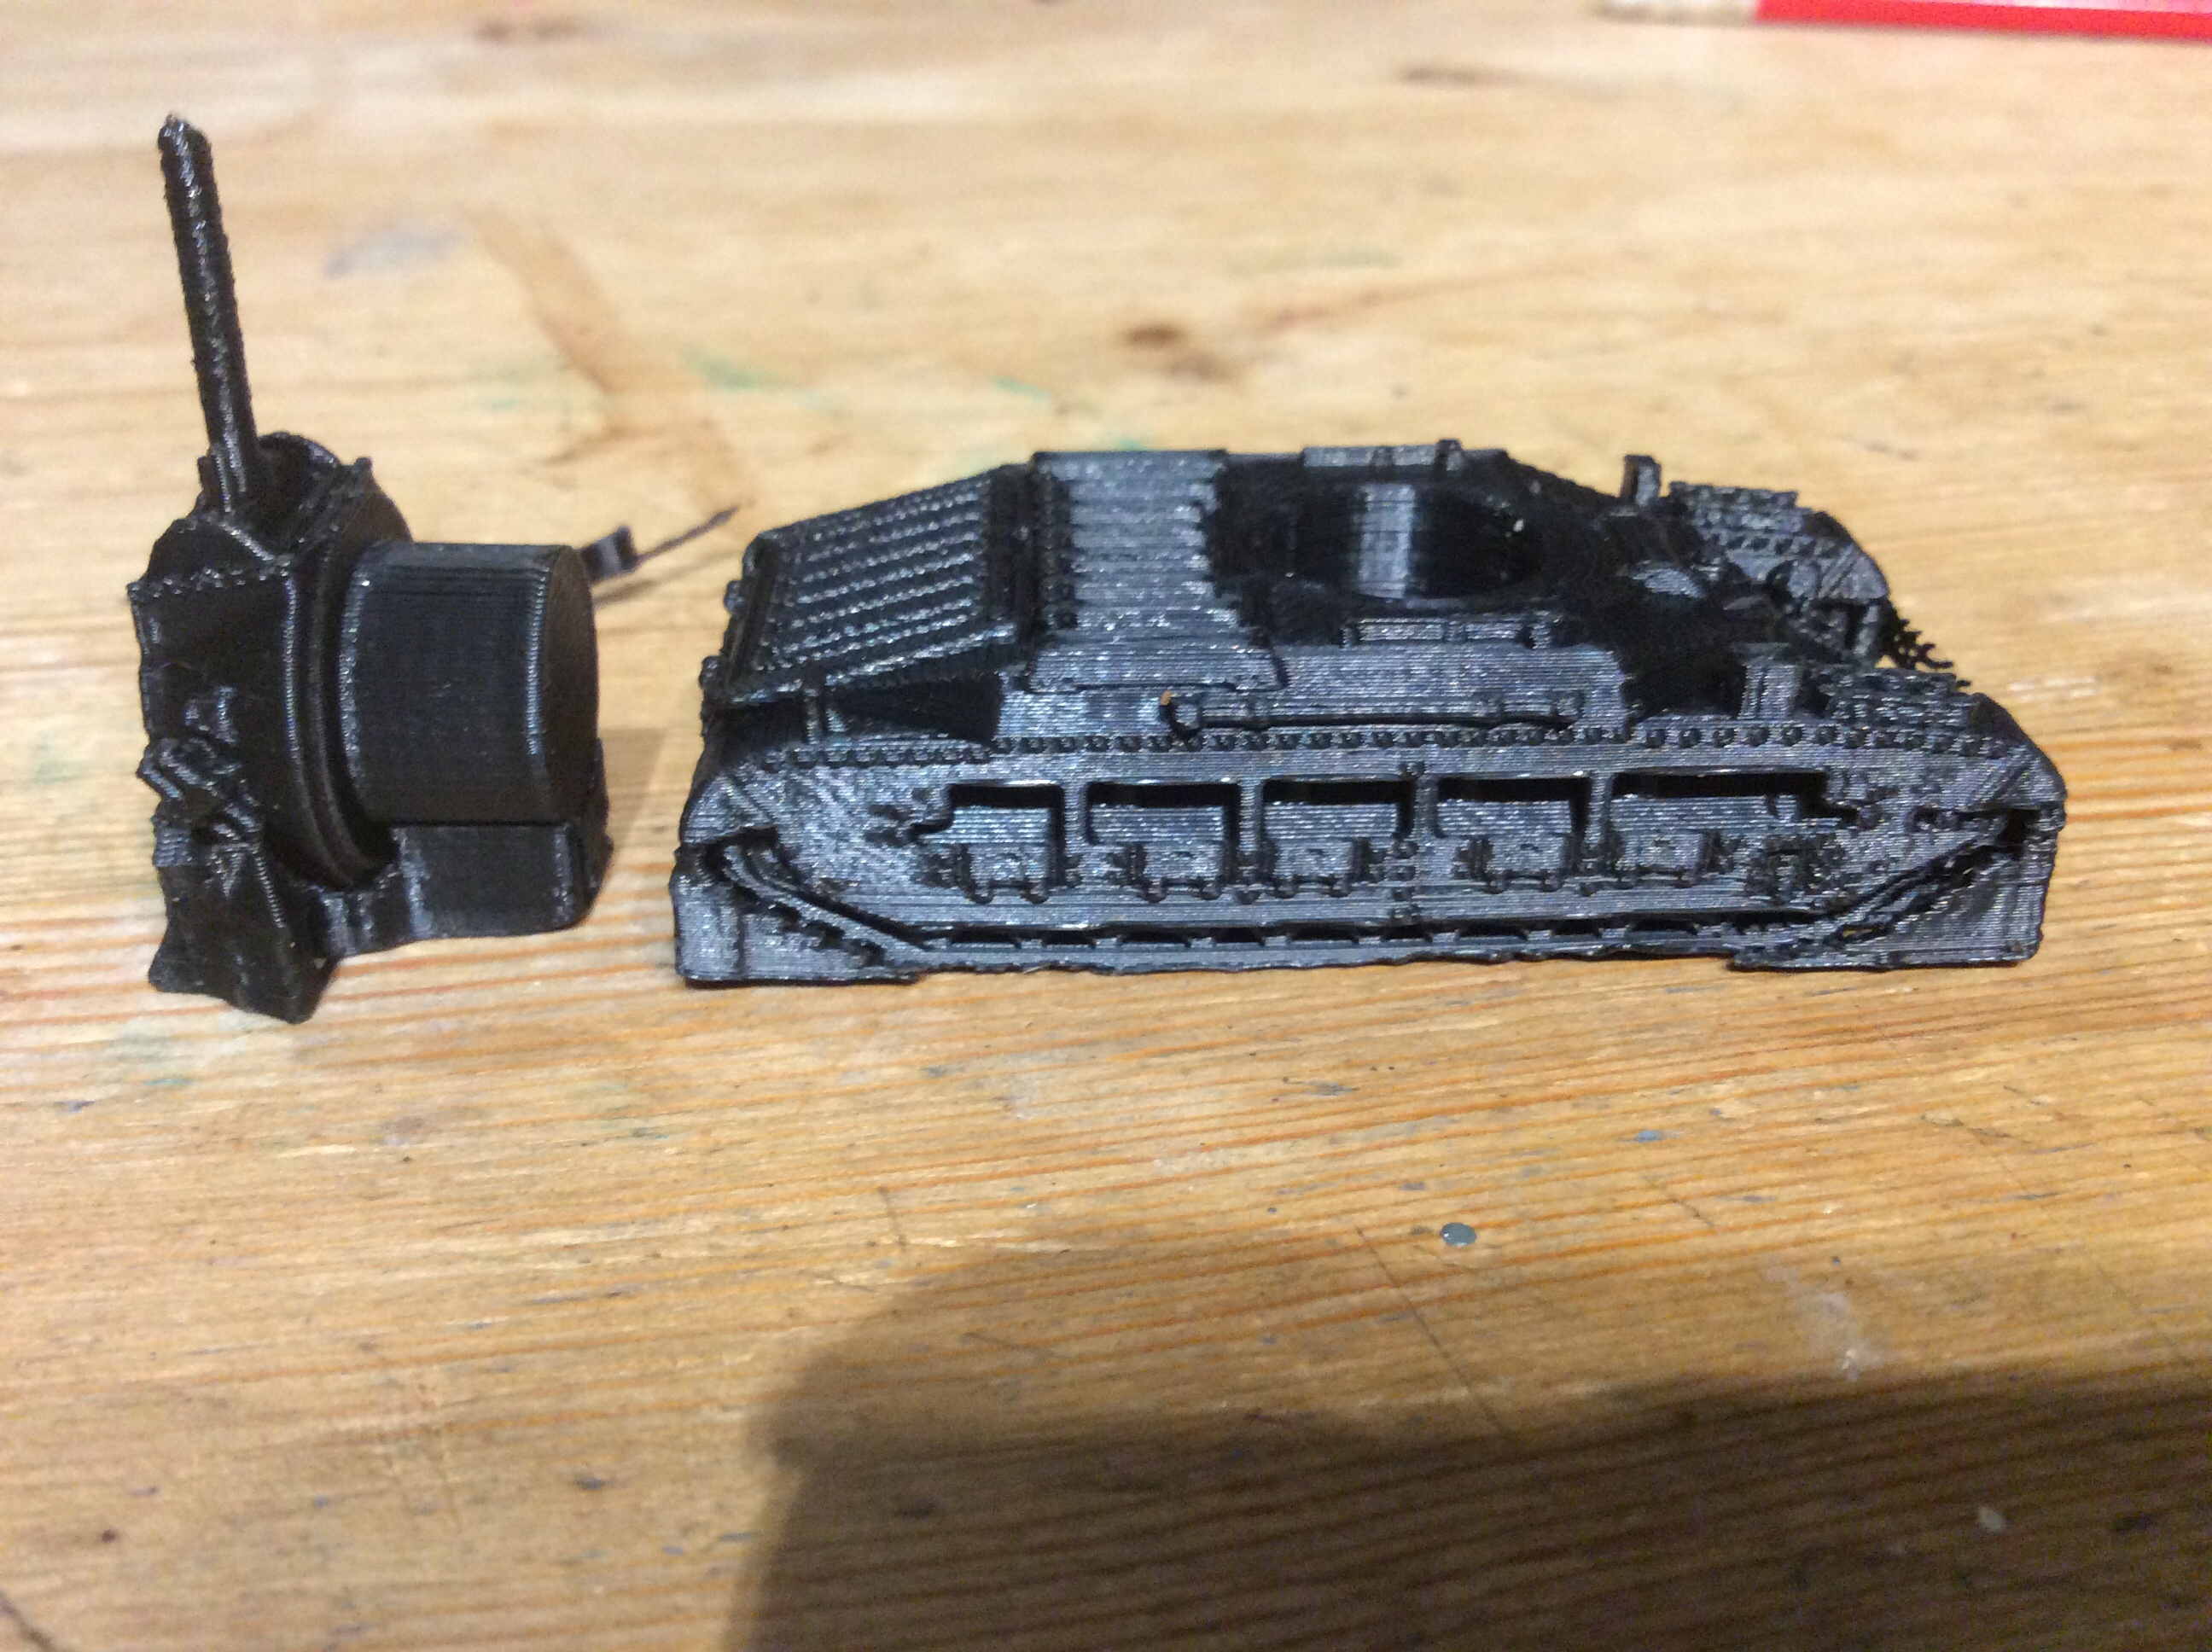
15mm Flames of War Vehicles and tanks

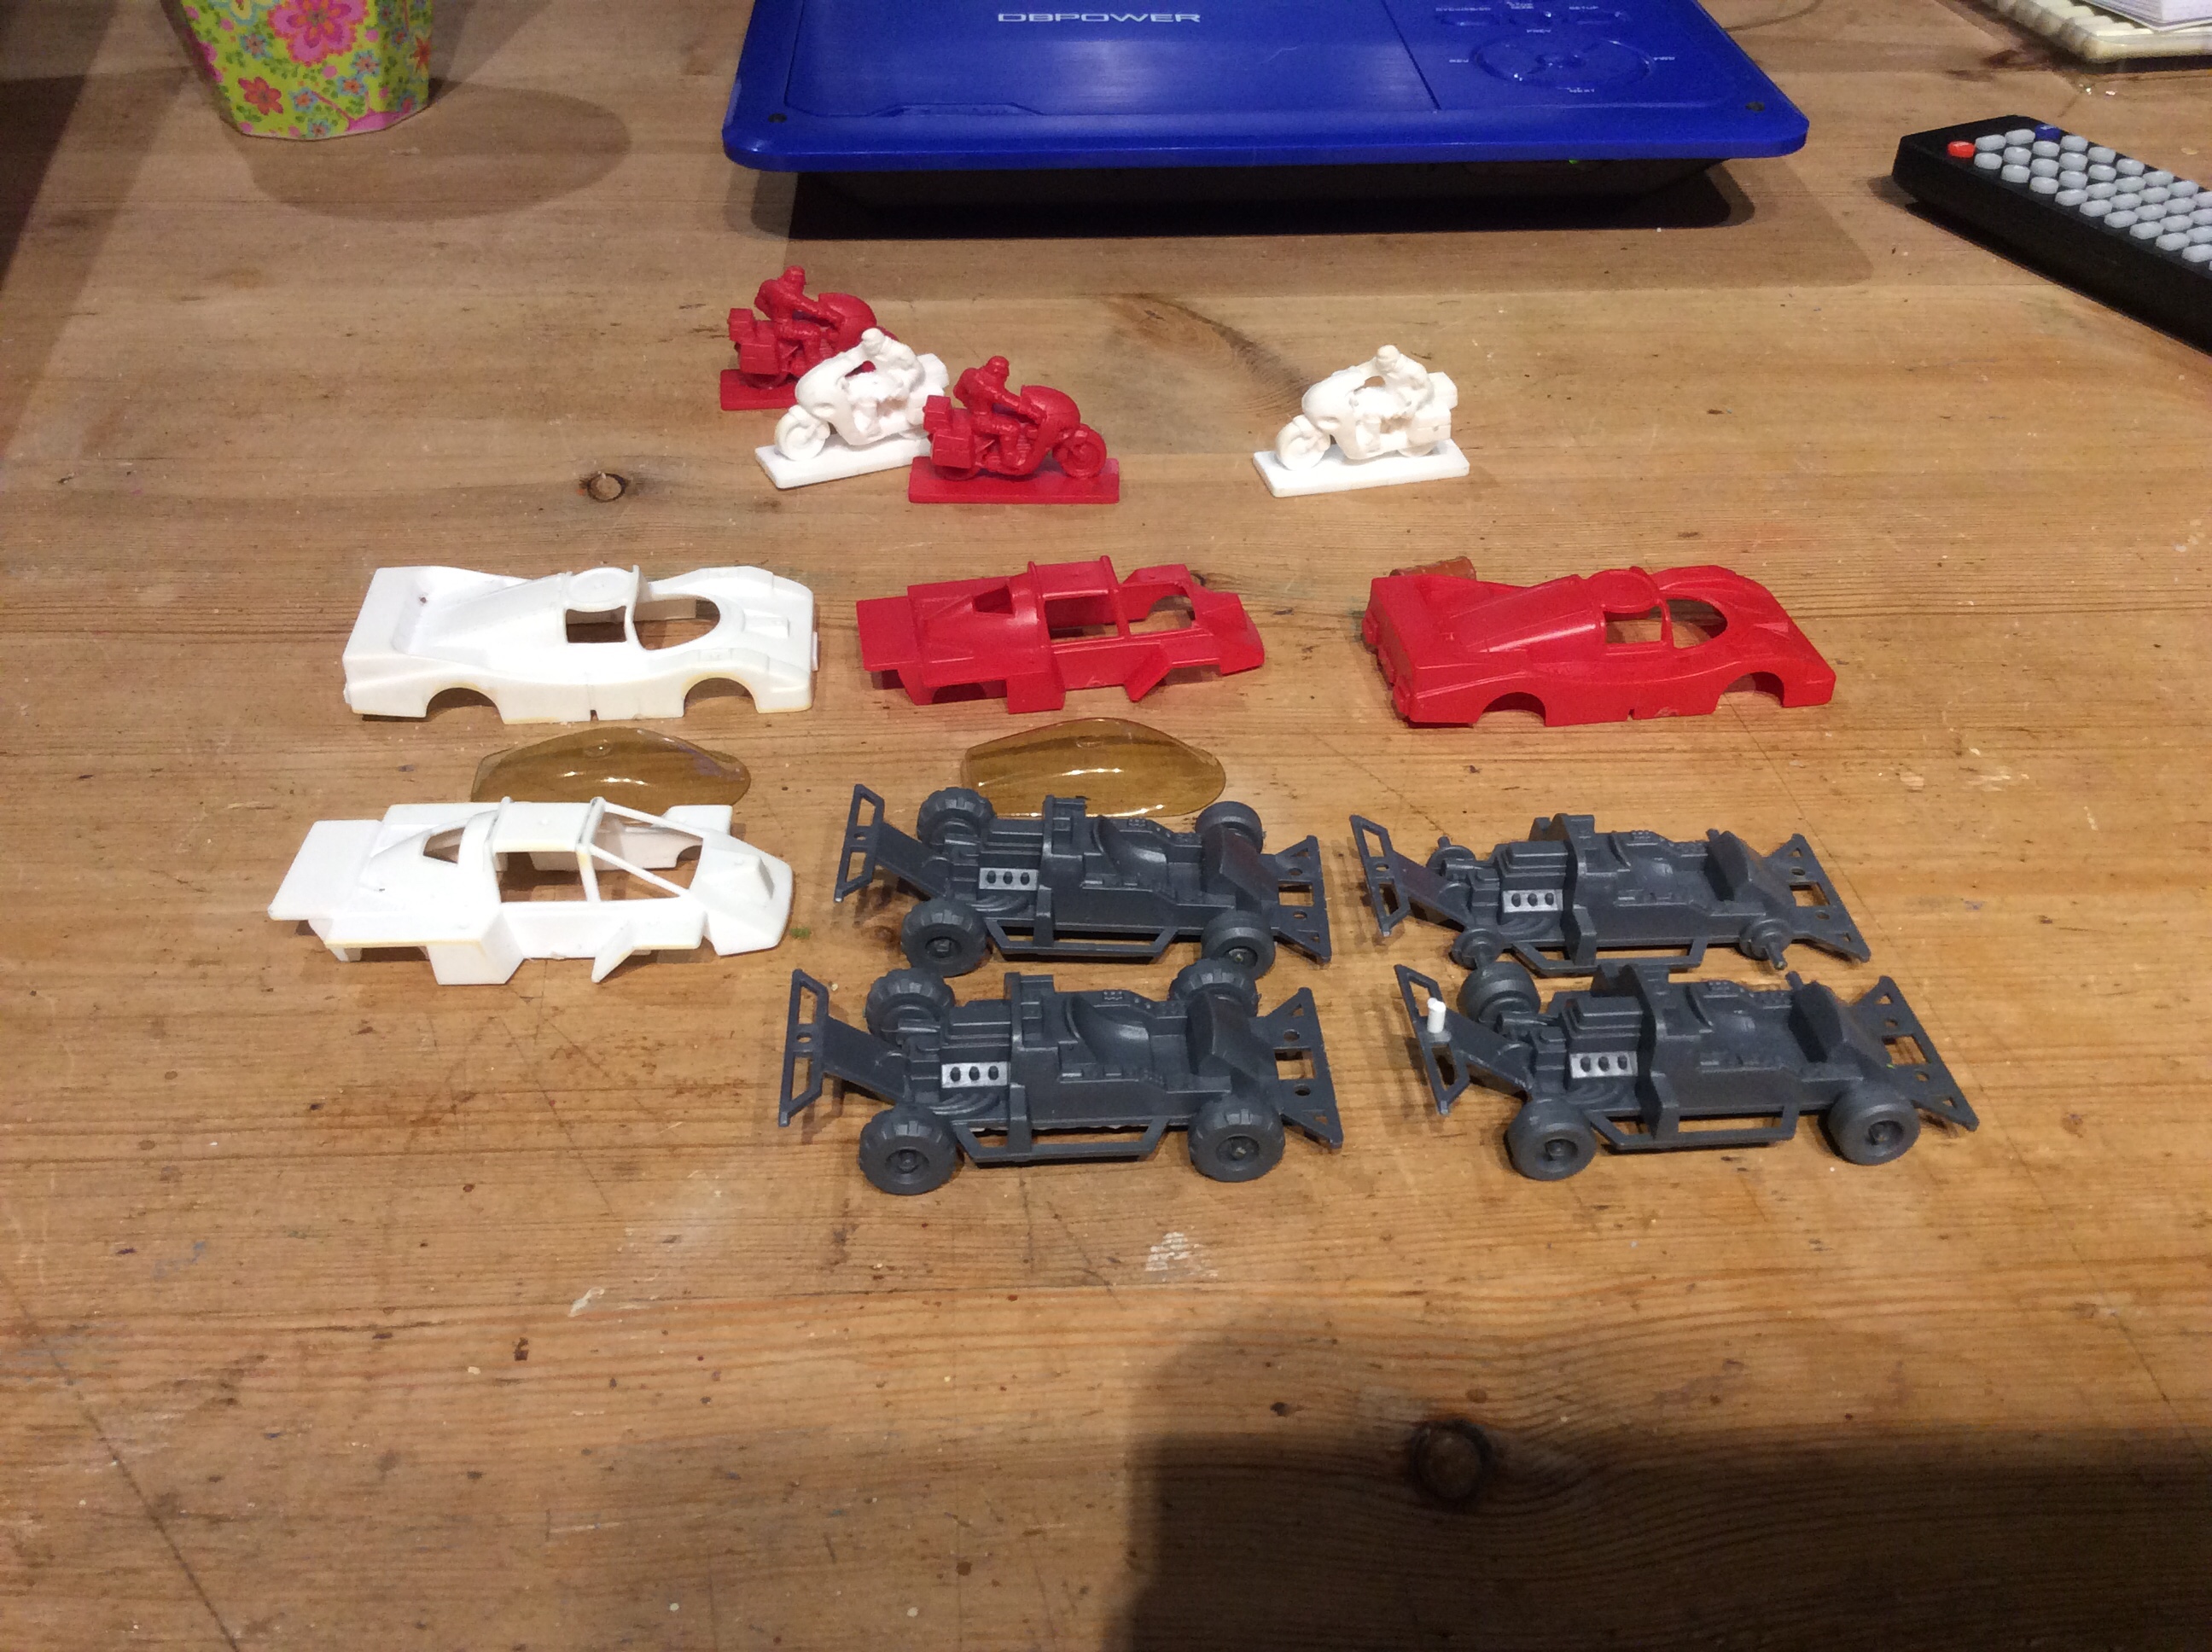
20mm Dark Future Vehicles

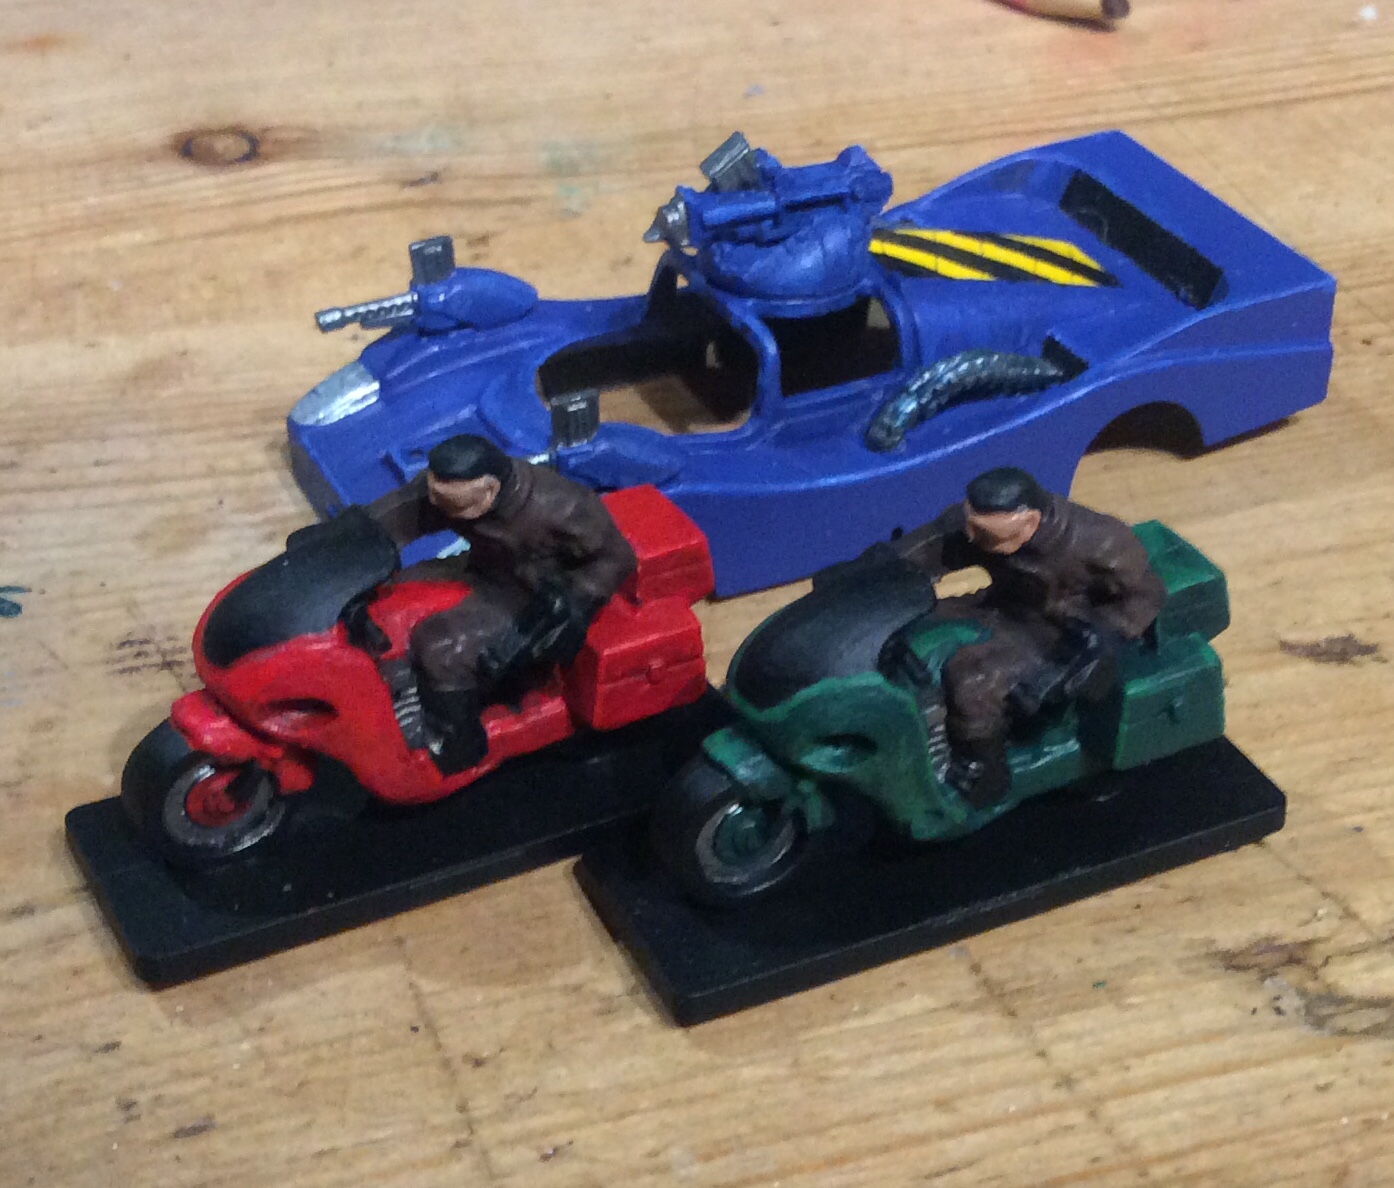
I decided on the latter:

img_5709

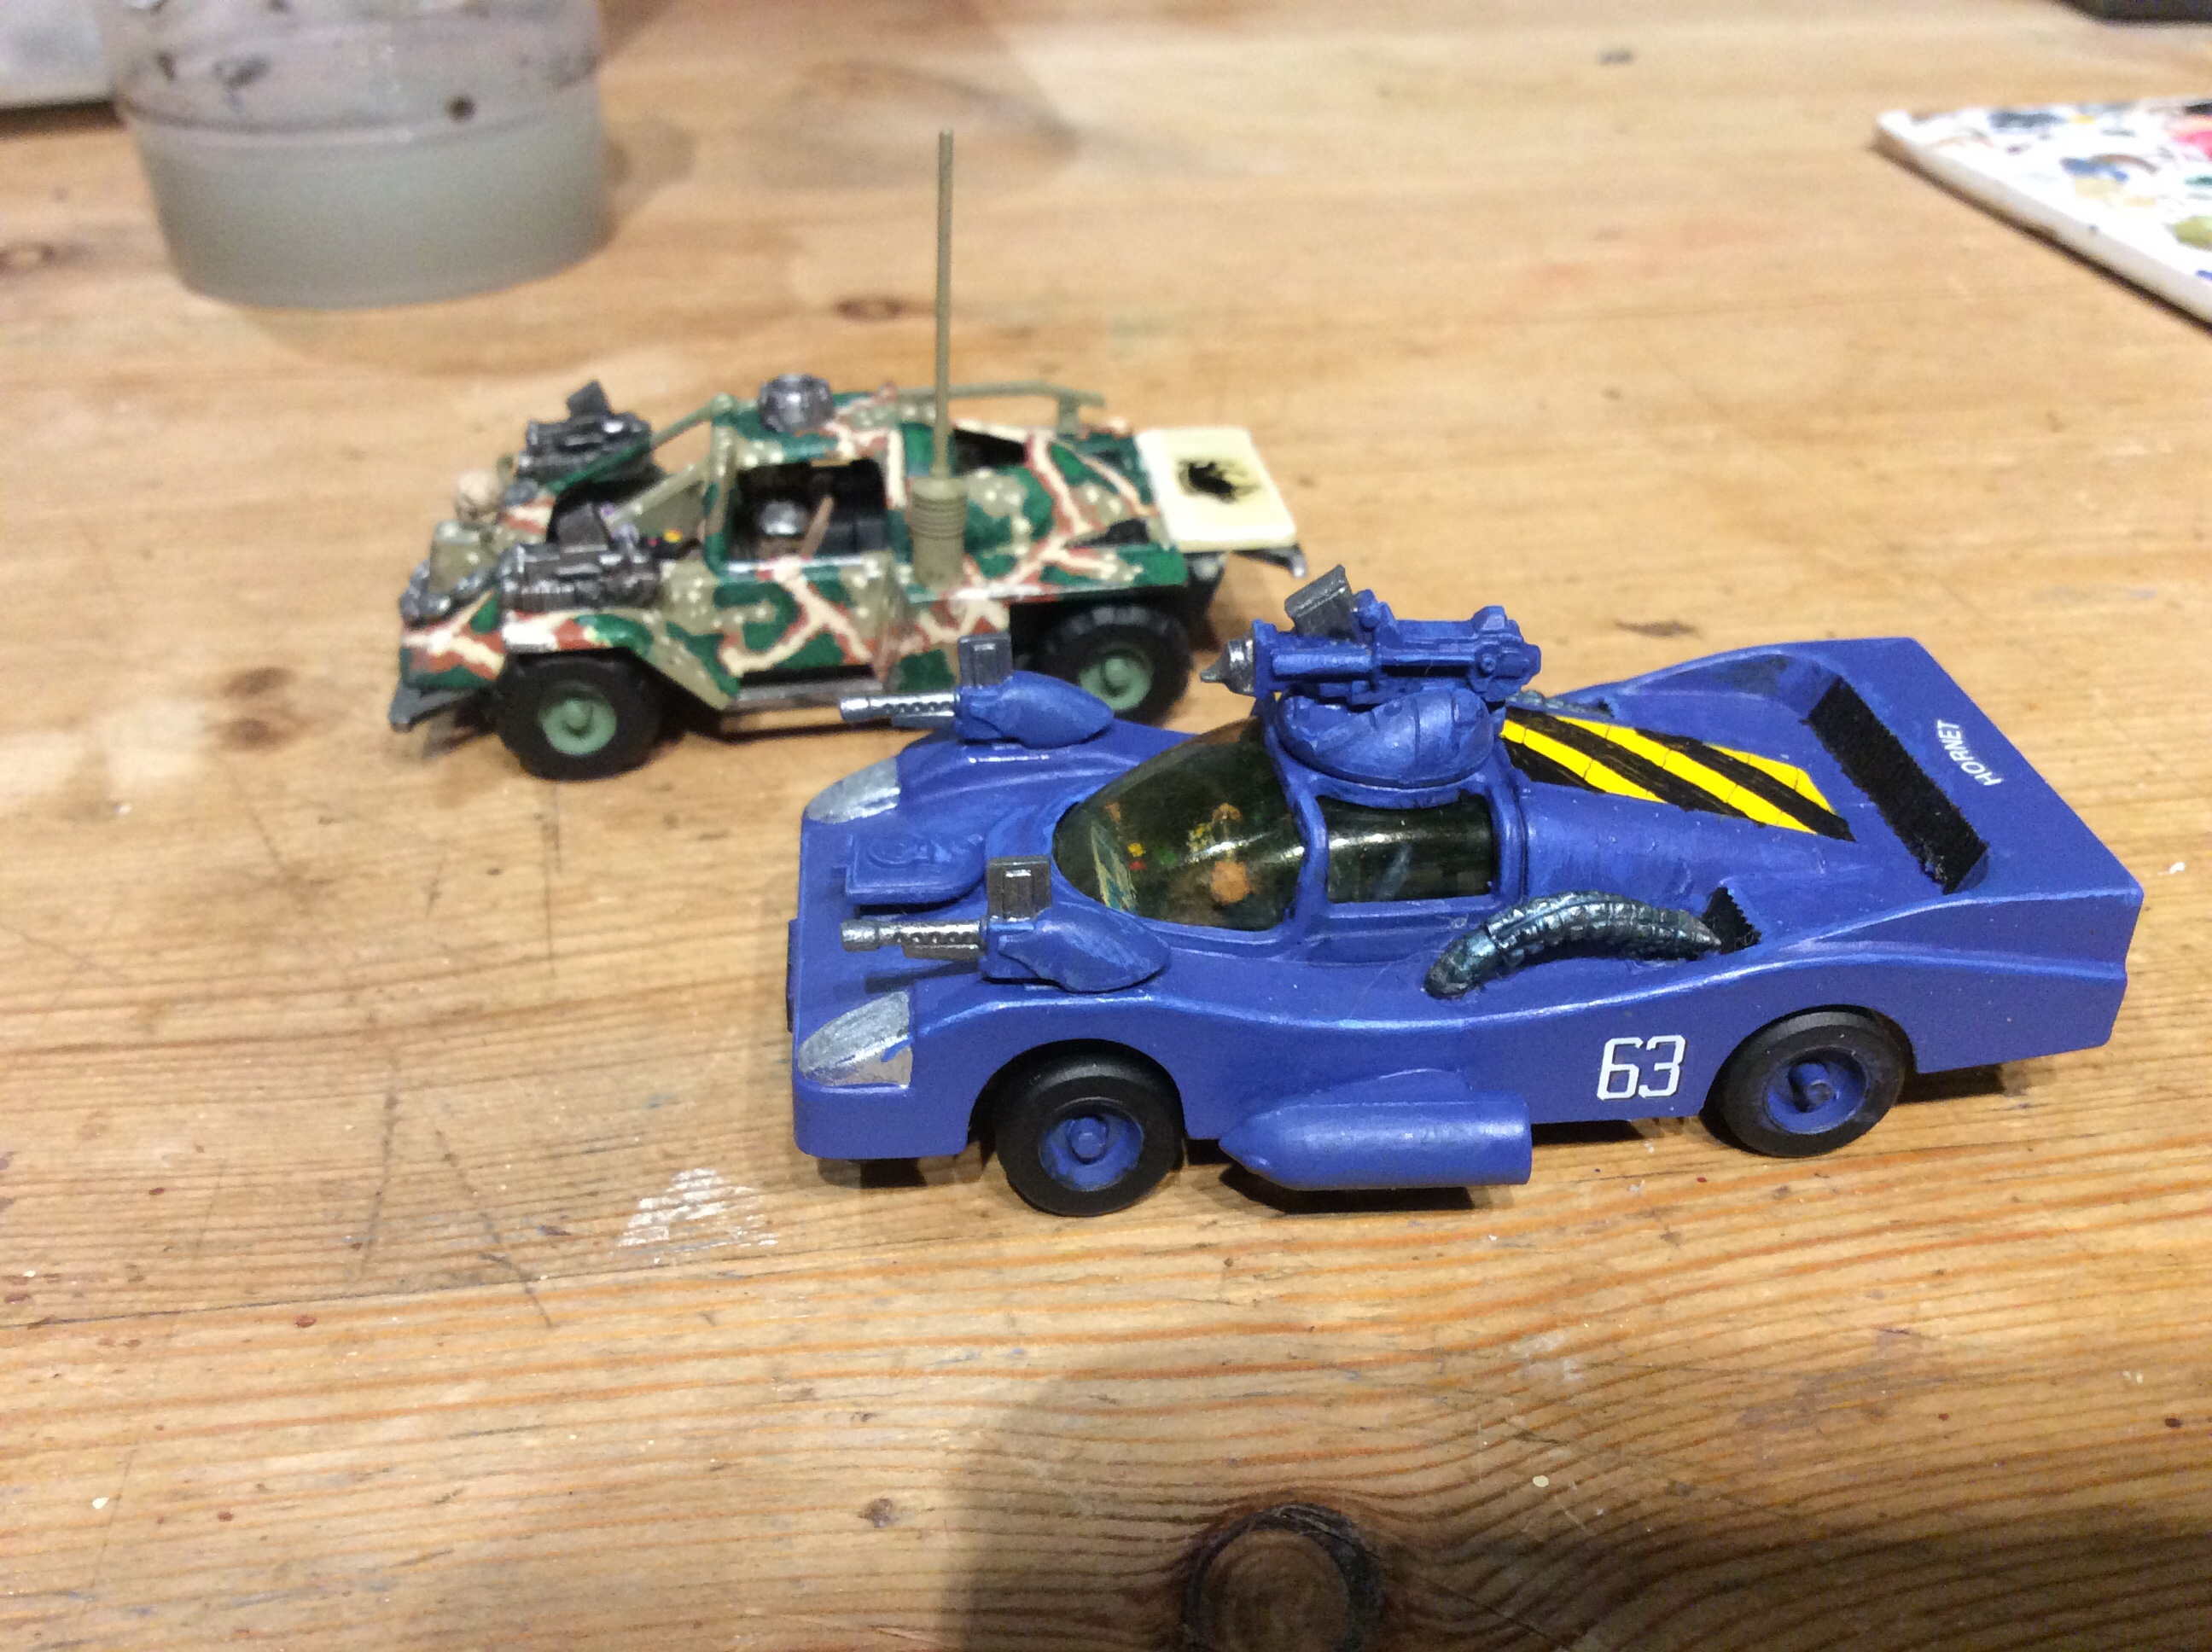
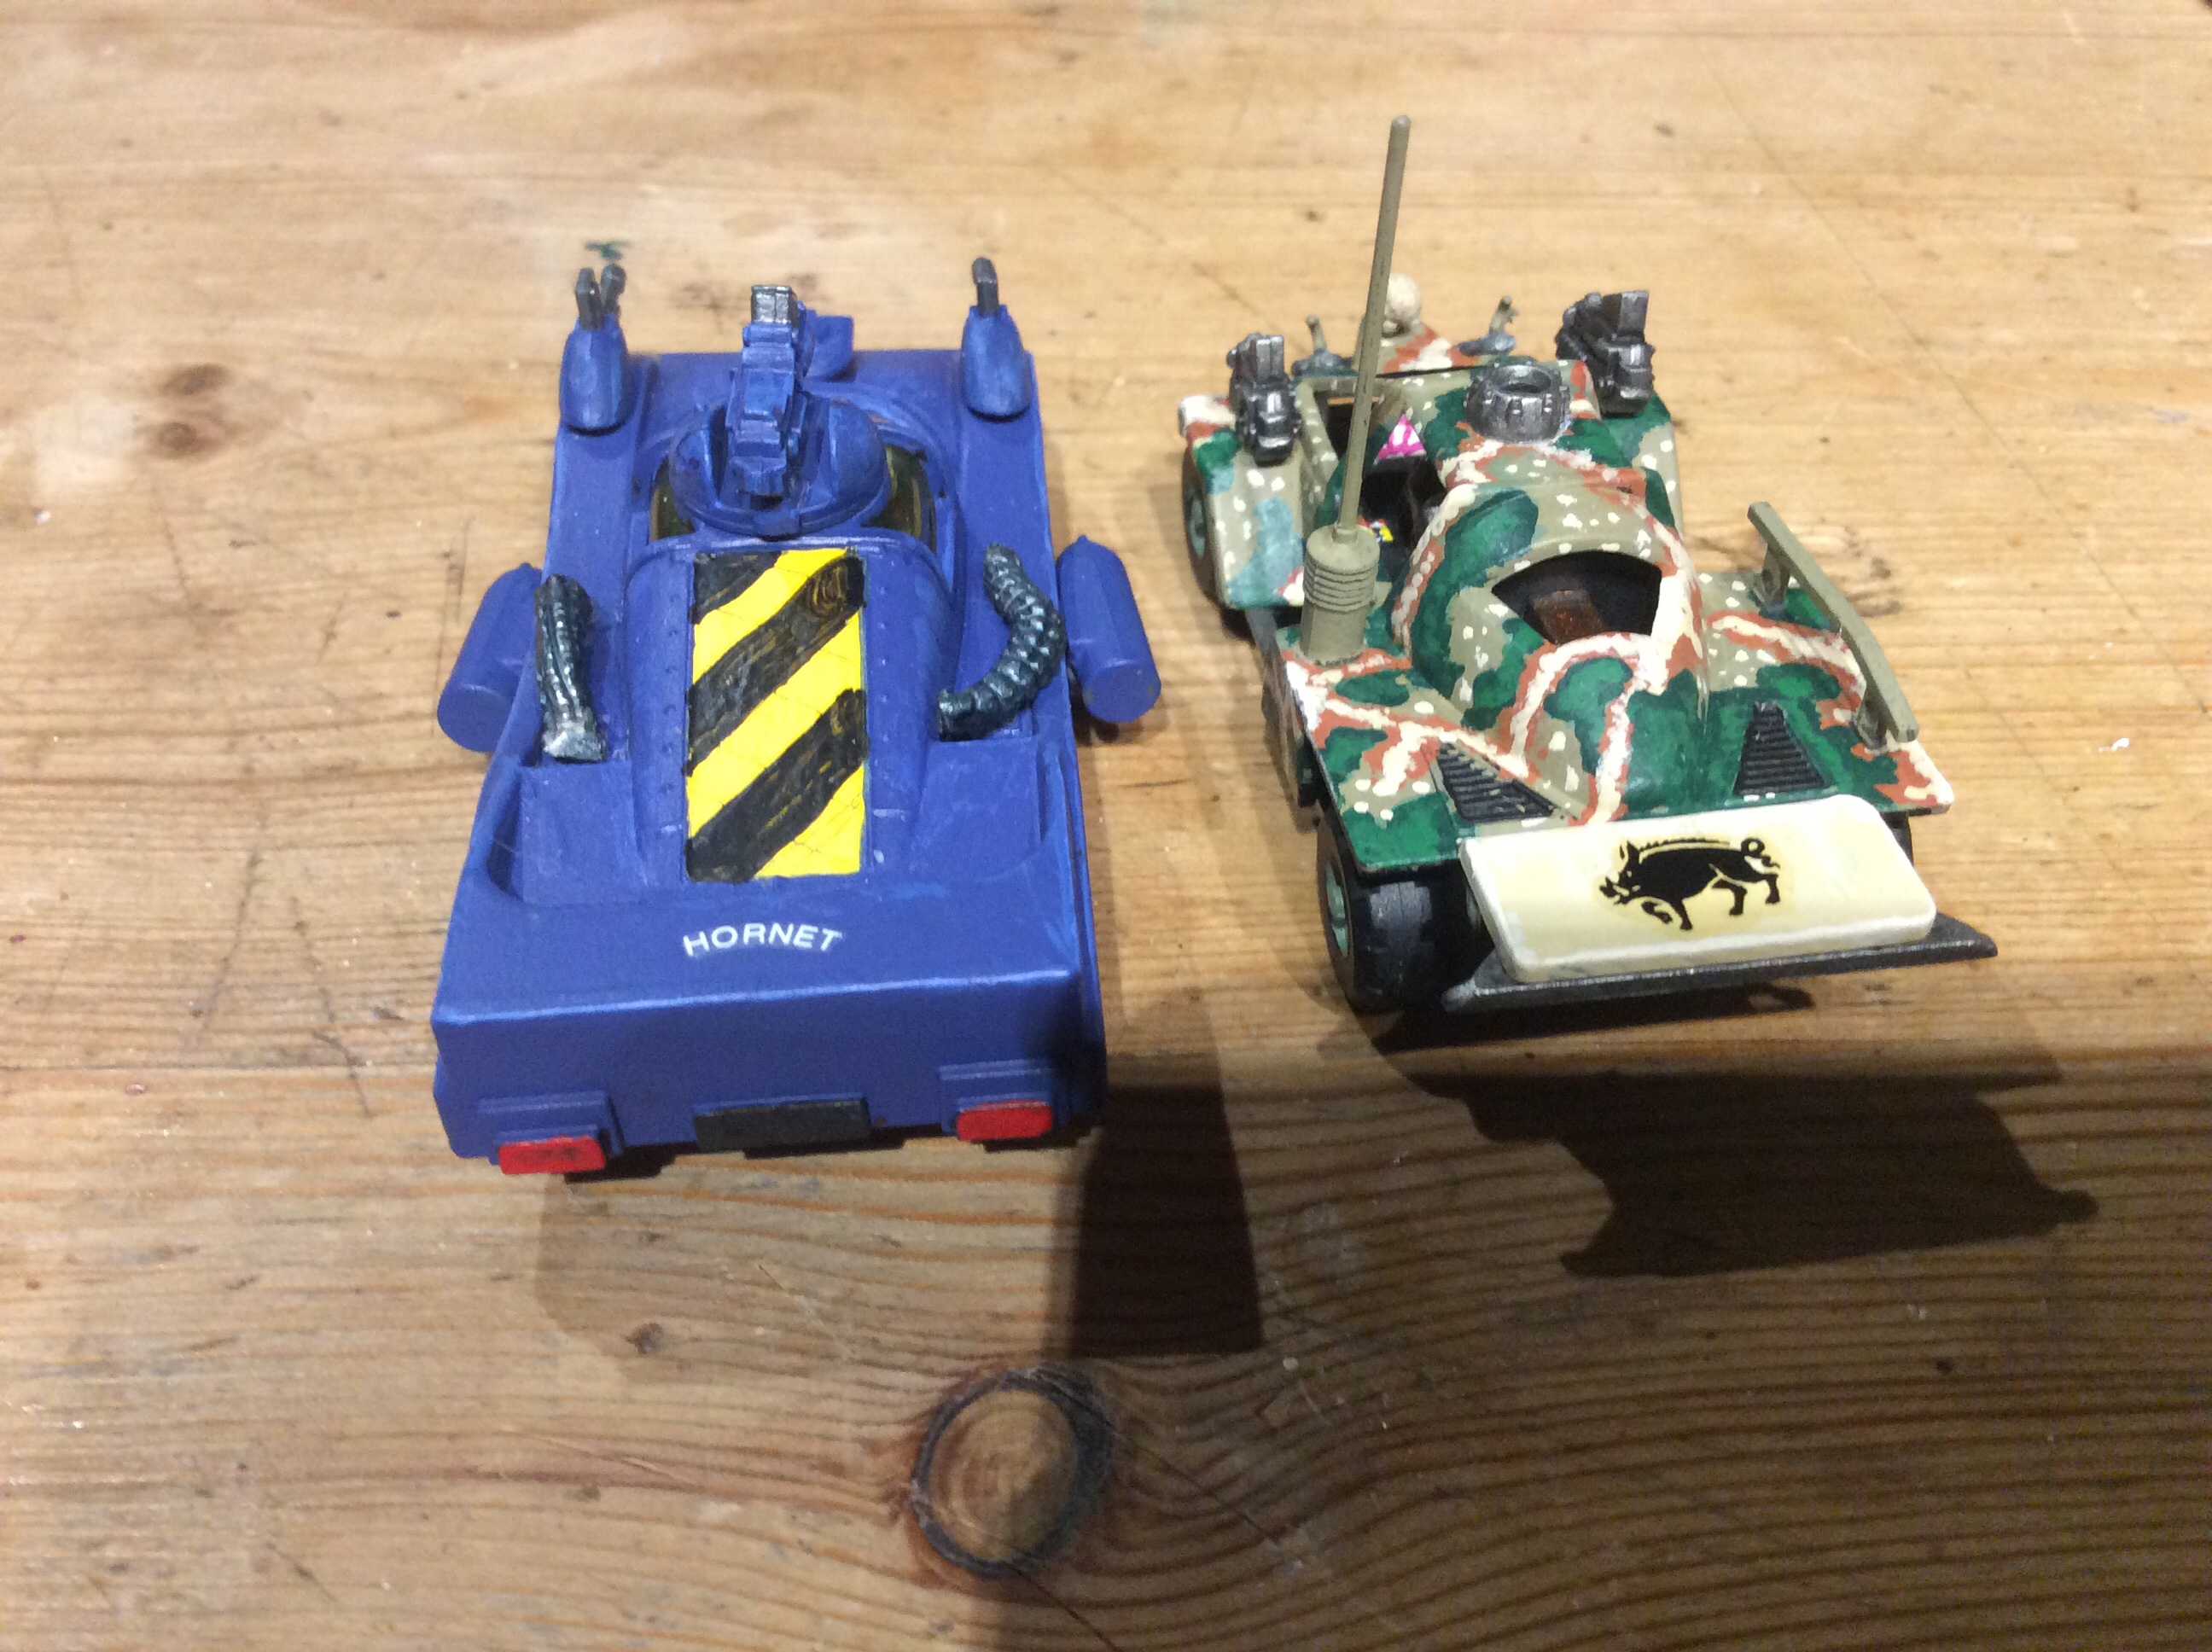
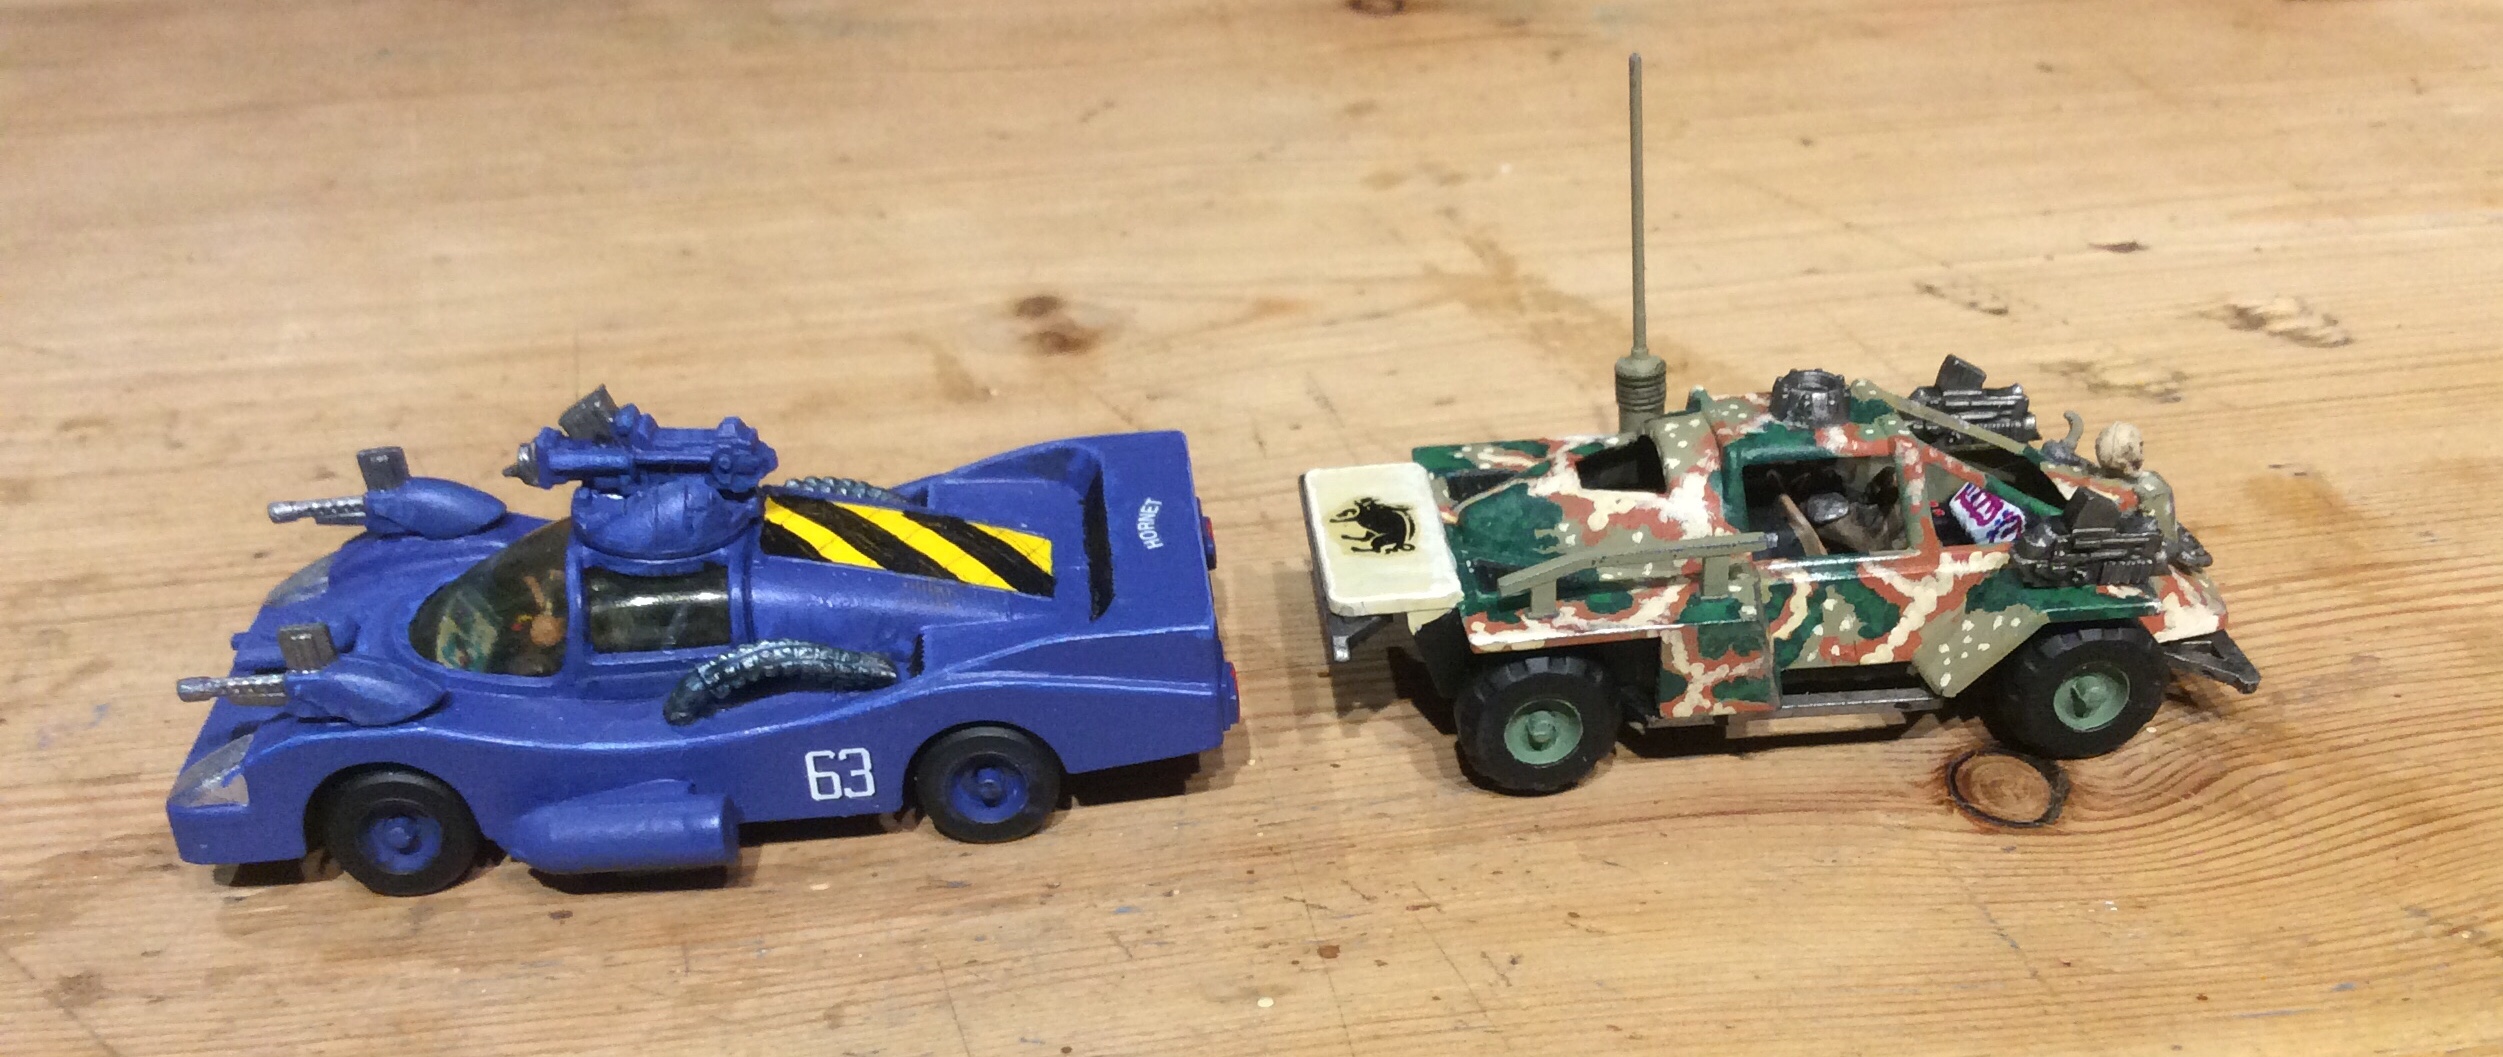
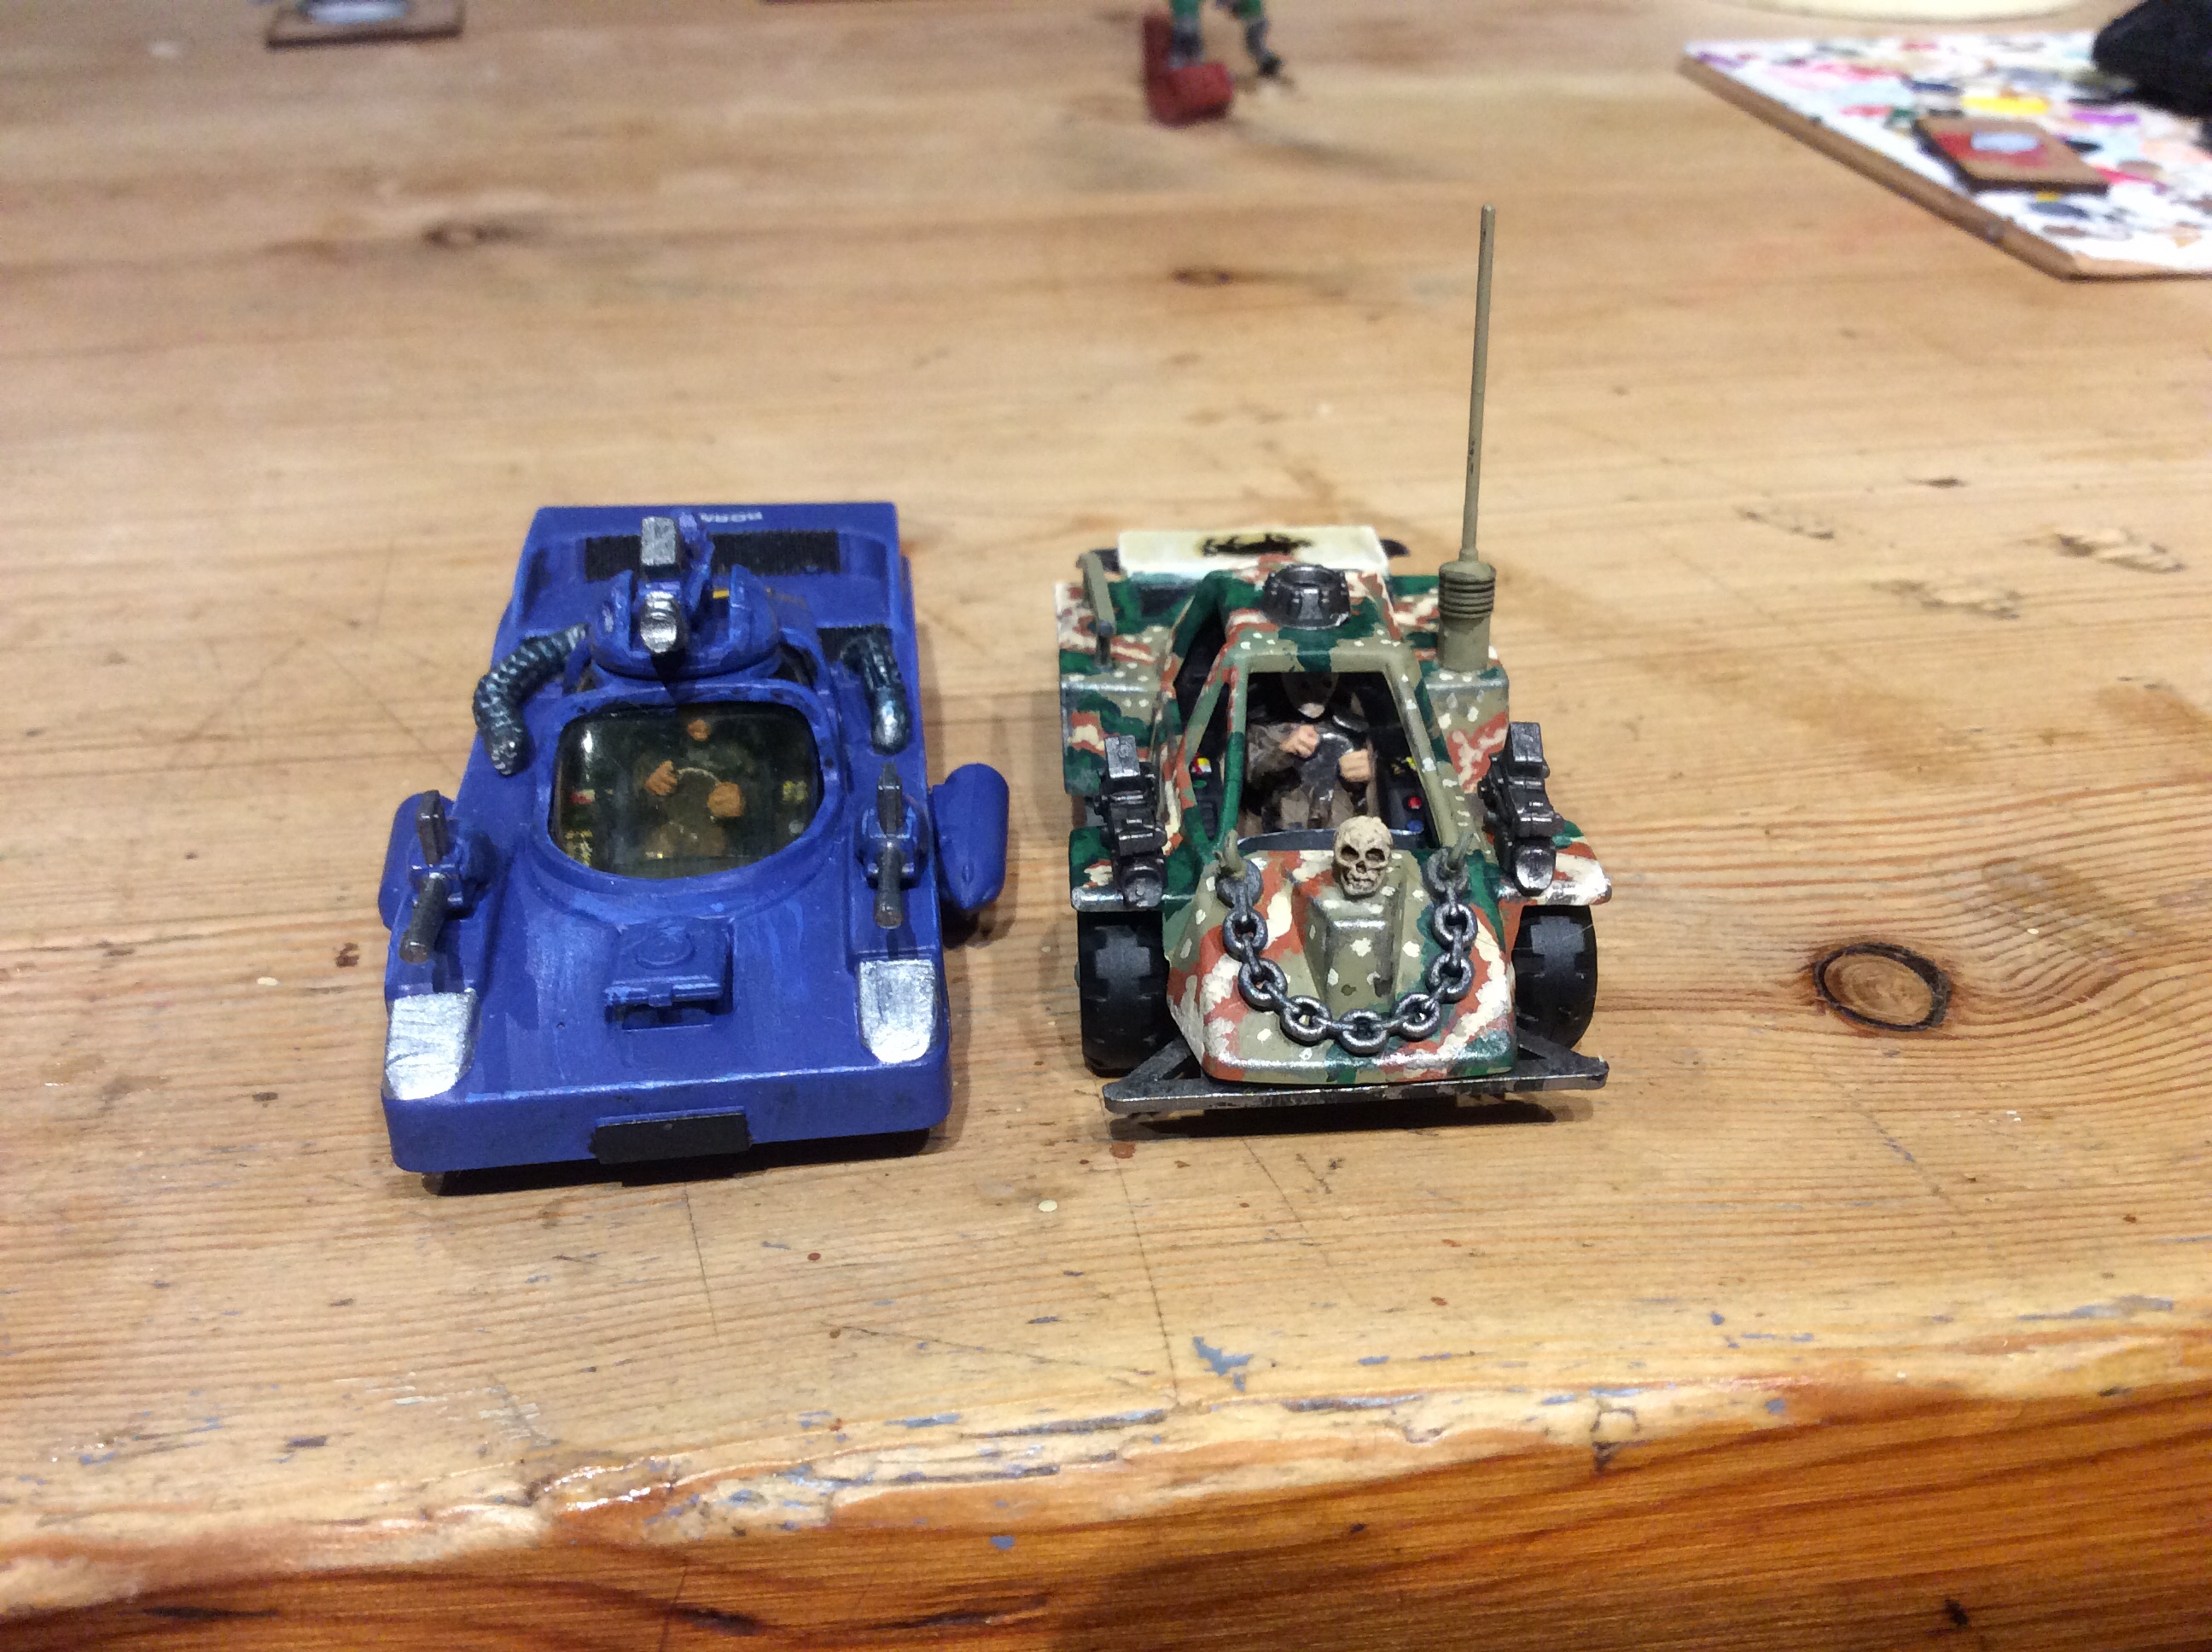
They went from the bare plastic to something I am rather pleased with.

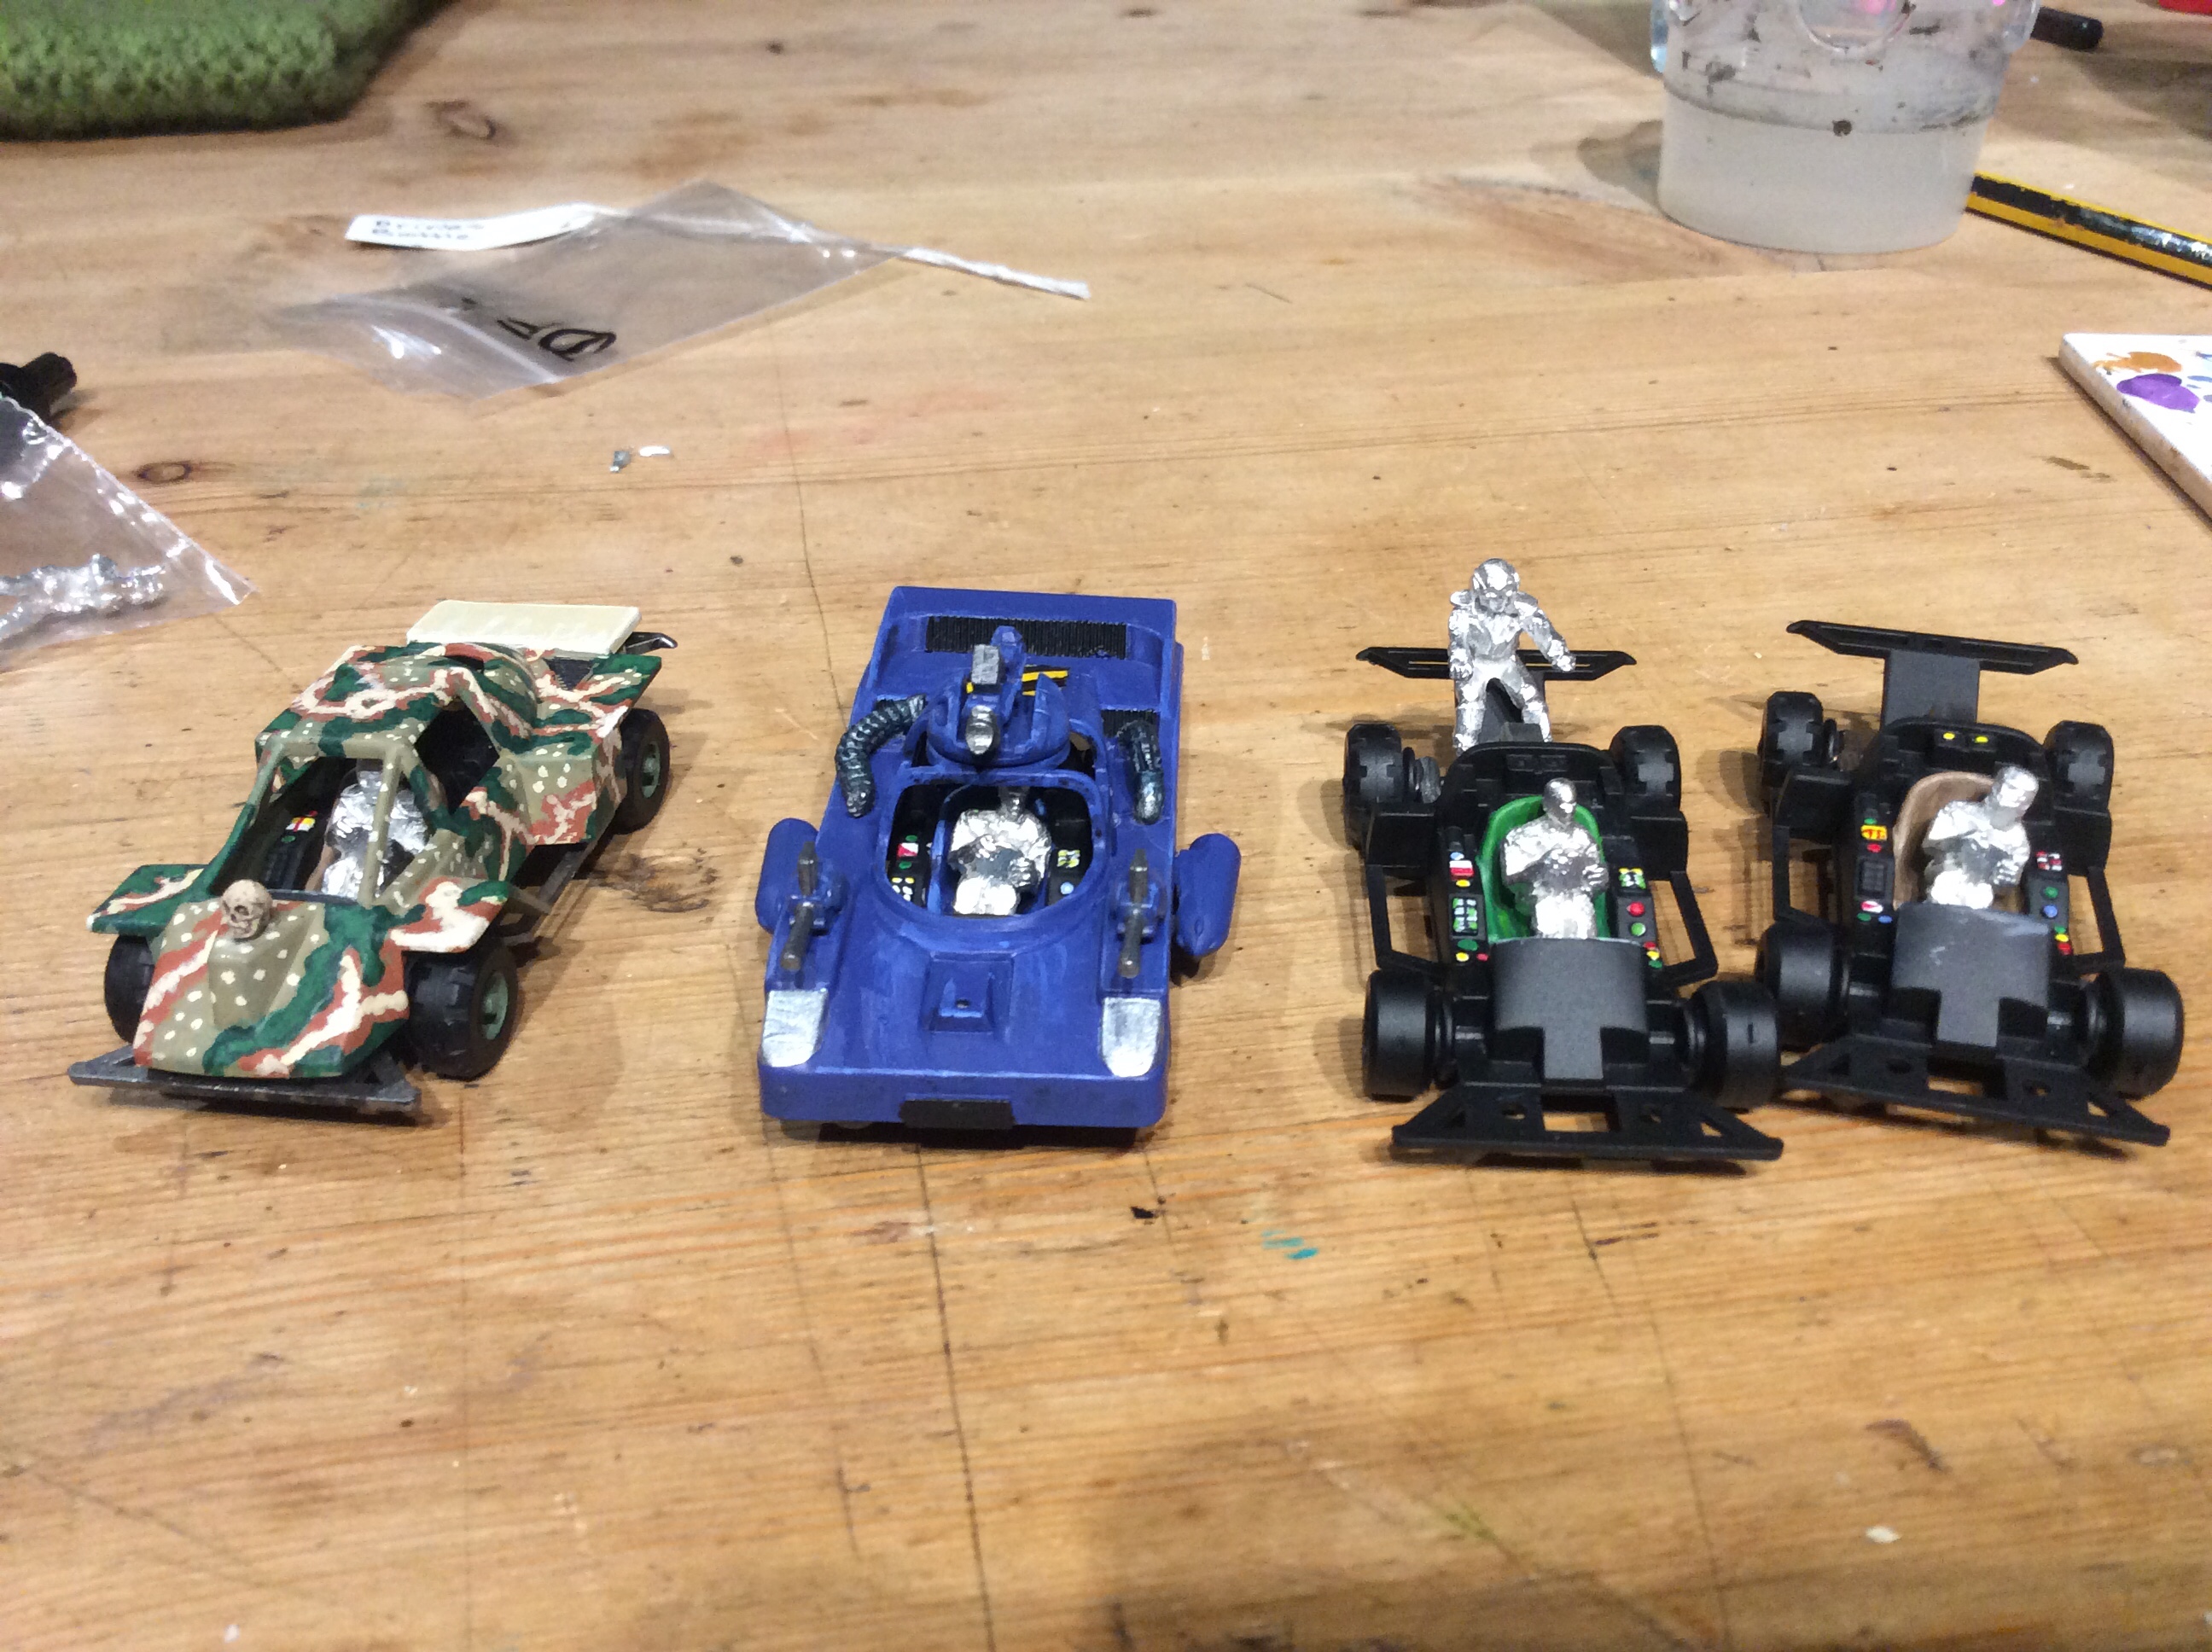
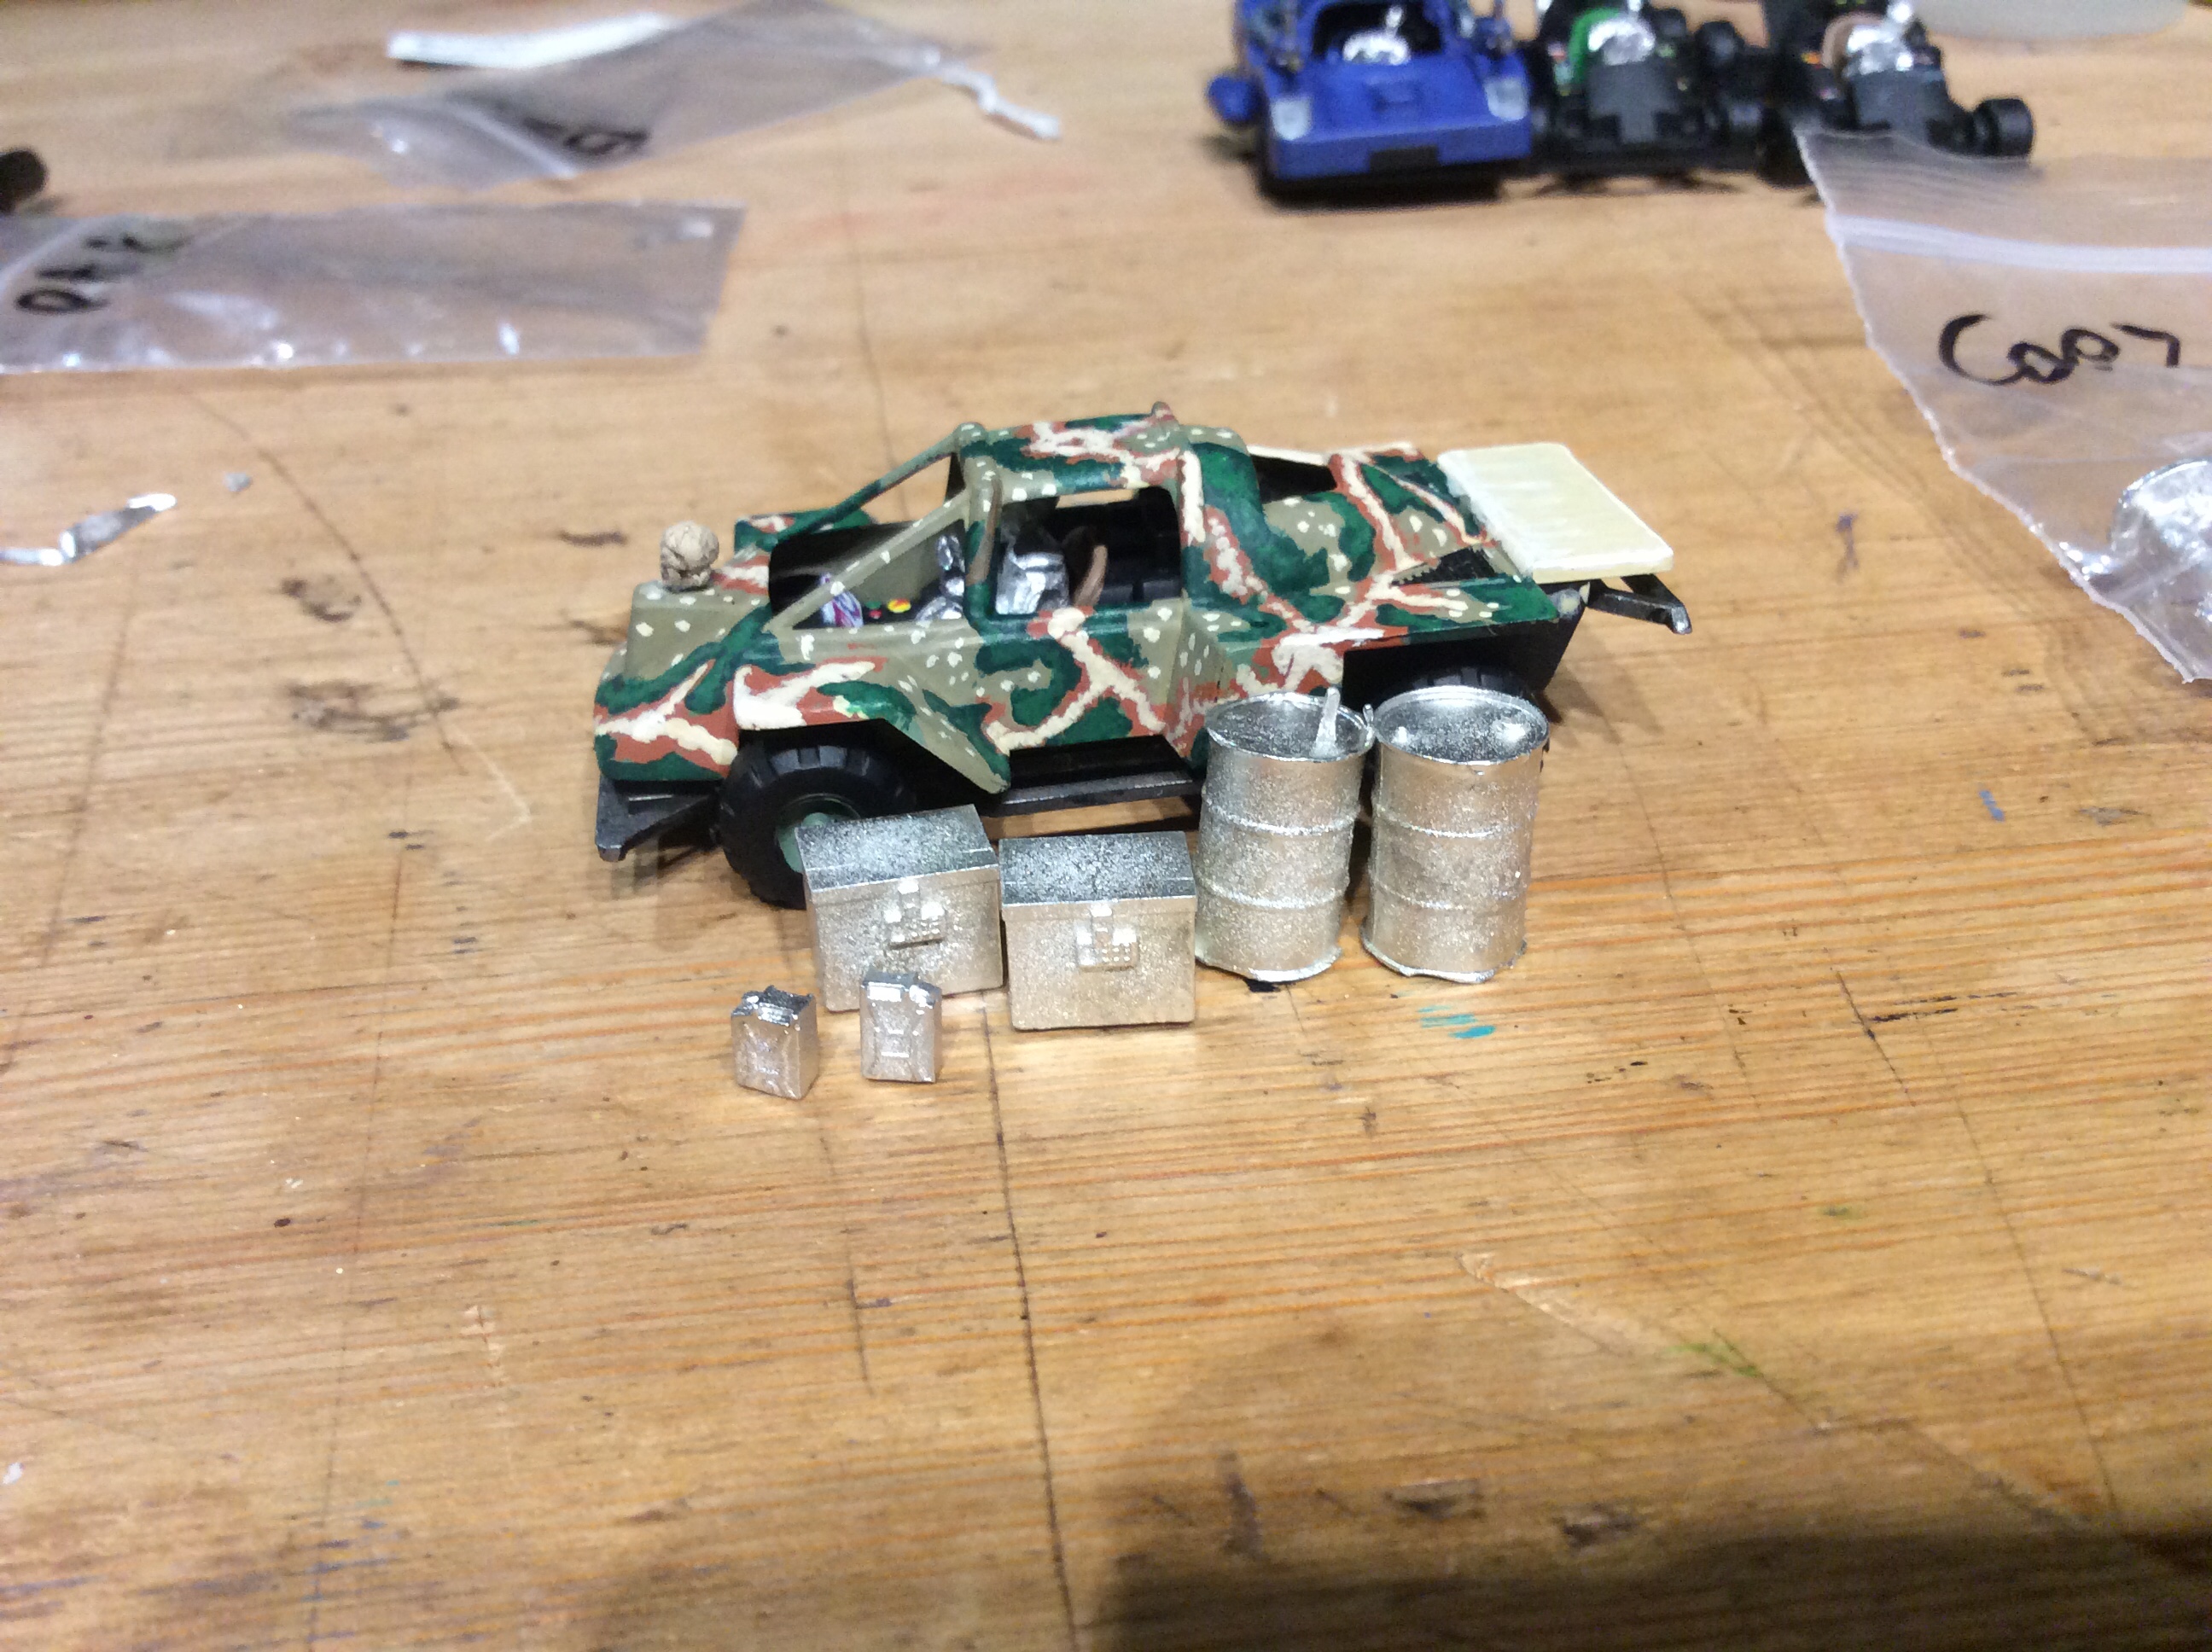
Rather than going for all four vehicles I decided to just do two cars and two bikes as well as drivers and a couple of operatives in their body armour to act as the dismounted drivers.

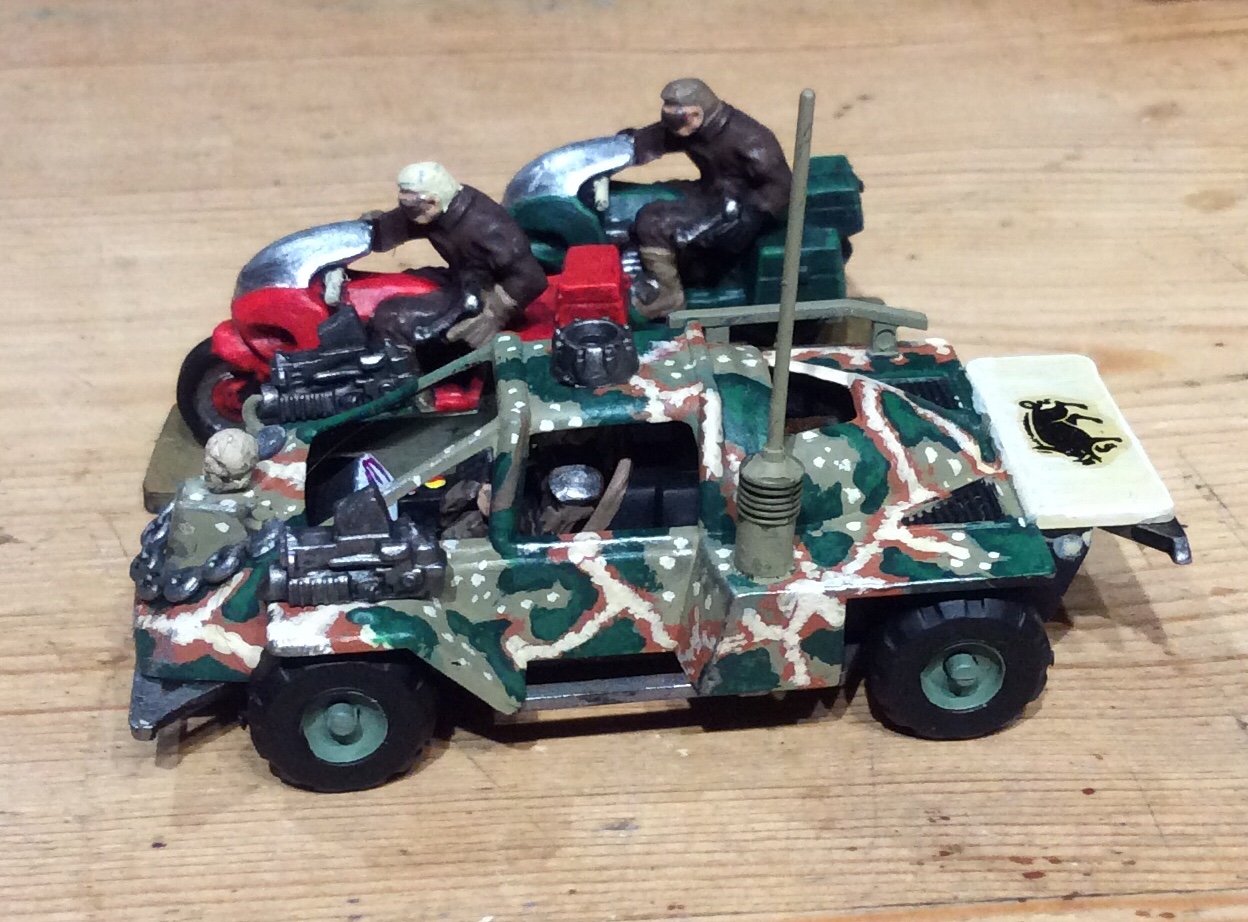
There were some issues with the builds and painting for that matter one regarding painting… I am rubbish at edge highlighting and then my original green on the renegade was too close to the khaki of the main body, it really got lost. this was solved by simply painting over it in a dark green.

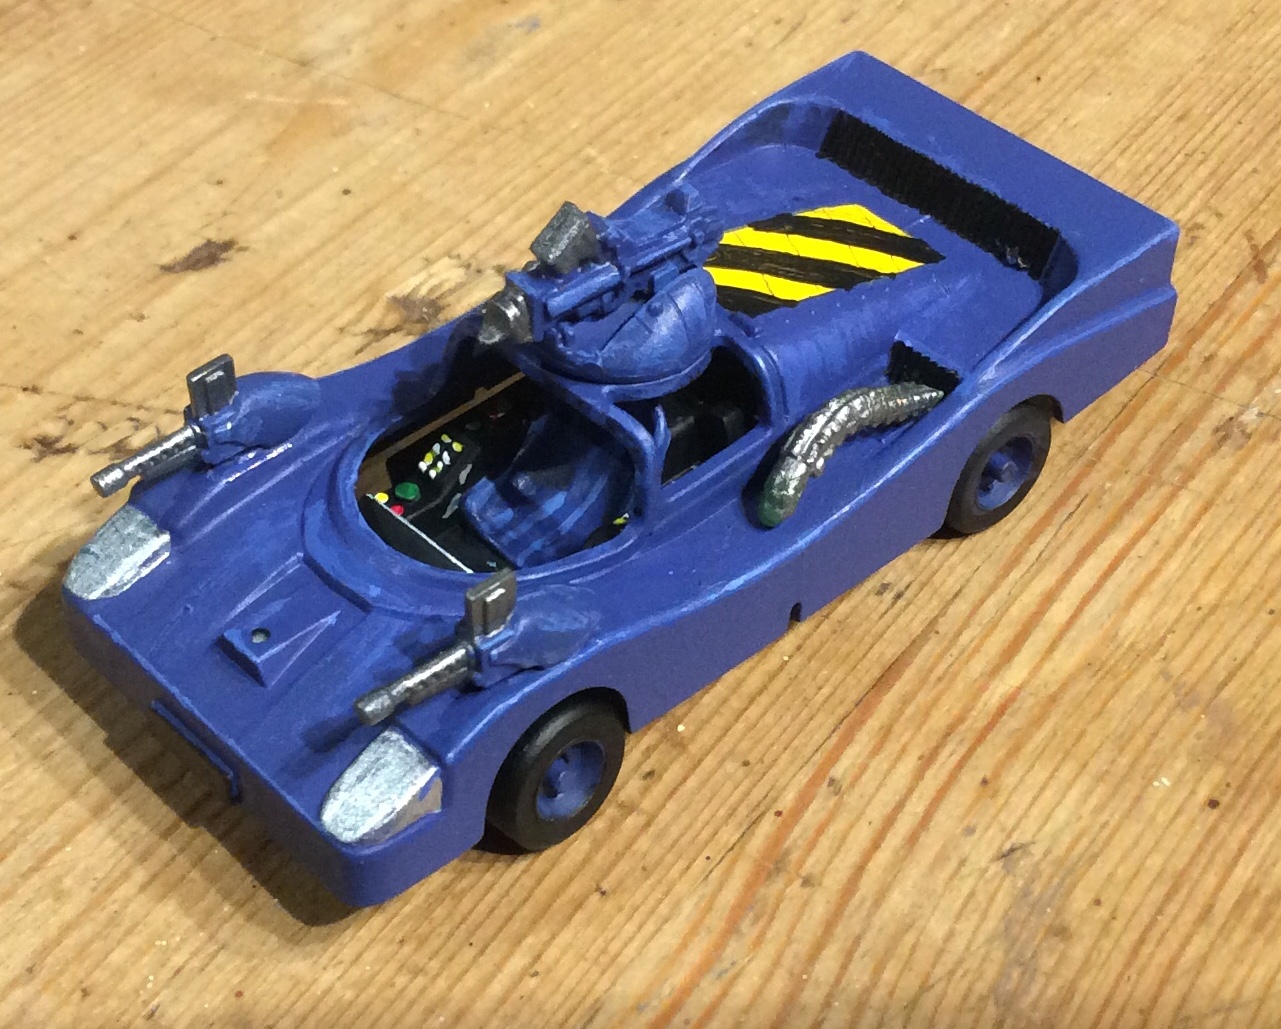
For the look of the thing, all of the dashboards and engines were painted too. I don’t normally undercoat black, but it was what I had a rattle can of so I went with it.

img_5757

The build issues weren’t hard to overcome, it just meant a bit of thought had to go into things.

Firstly each car has 5 pre-drilled holes (actually 7 for the Interceptor) some of these should have been filled prior to painting, but I forgot.

I added various bits and bobs from either greenstuff or some extras from a world war 2 tank sprue in my bits box.

The drivers proved to be problematic in that they just fitted into the Marauder and just didn’t fit into the Interceptor, I didn’t actually realise this until I came to glue the body to the chassis. Much swearing ensued… at least I know for next time… no doubt I will forget and do exactly the same as this time!

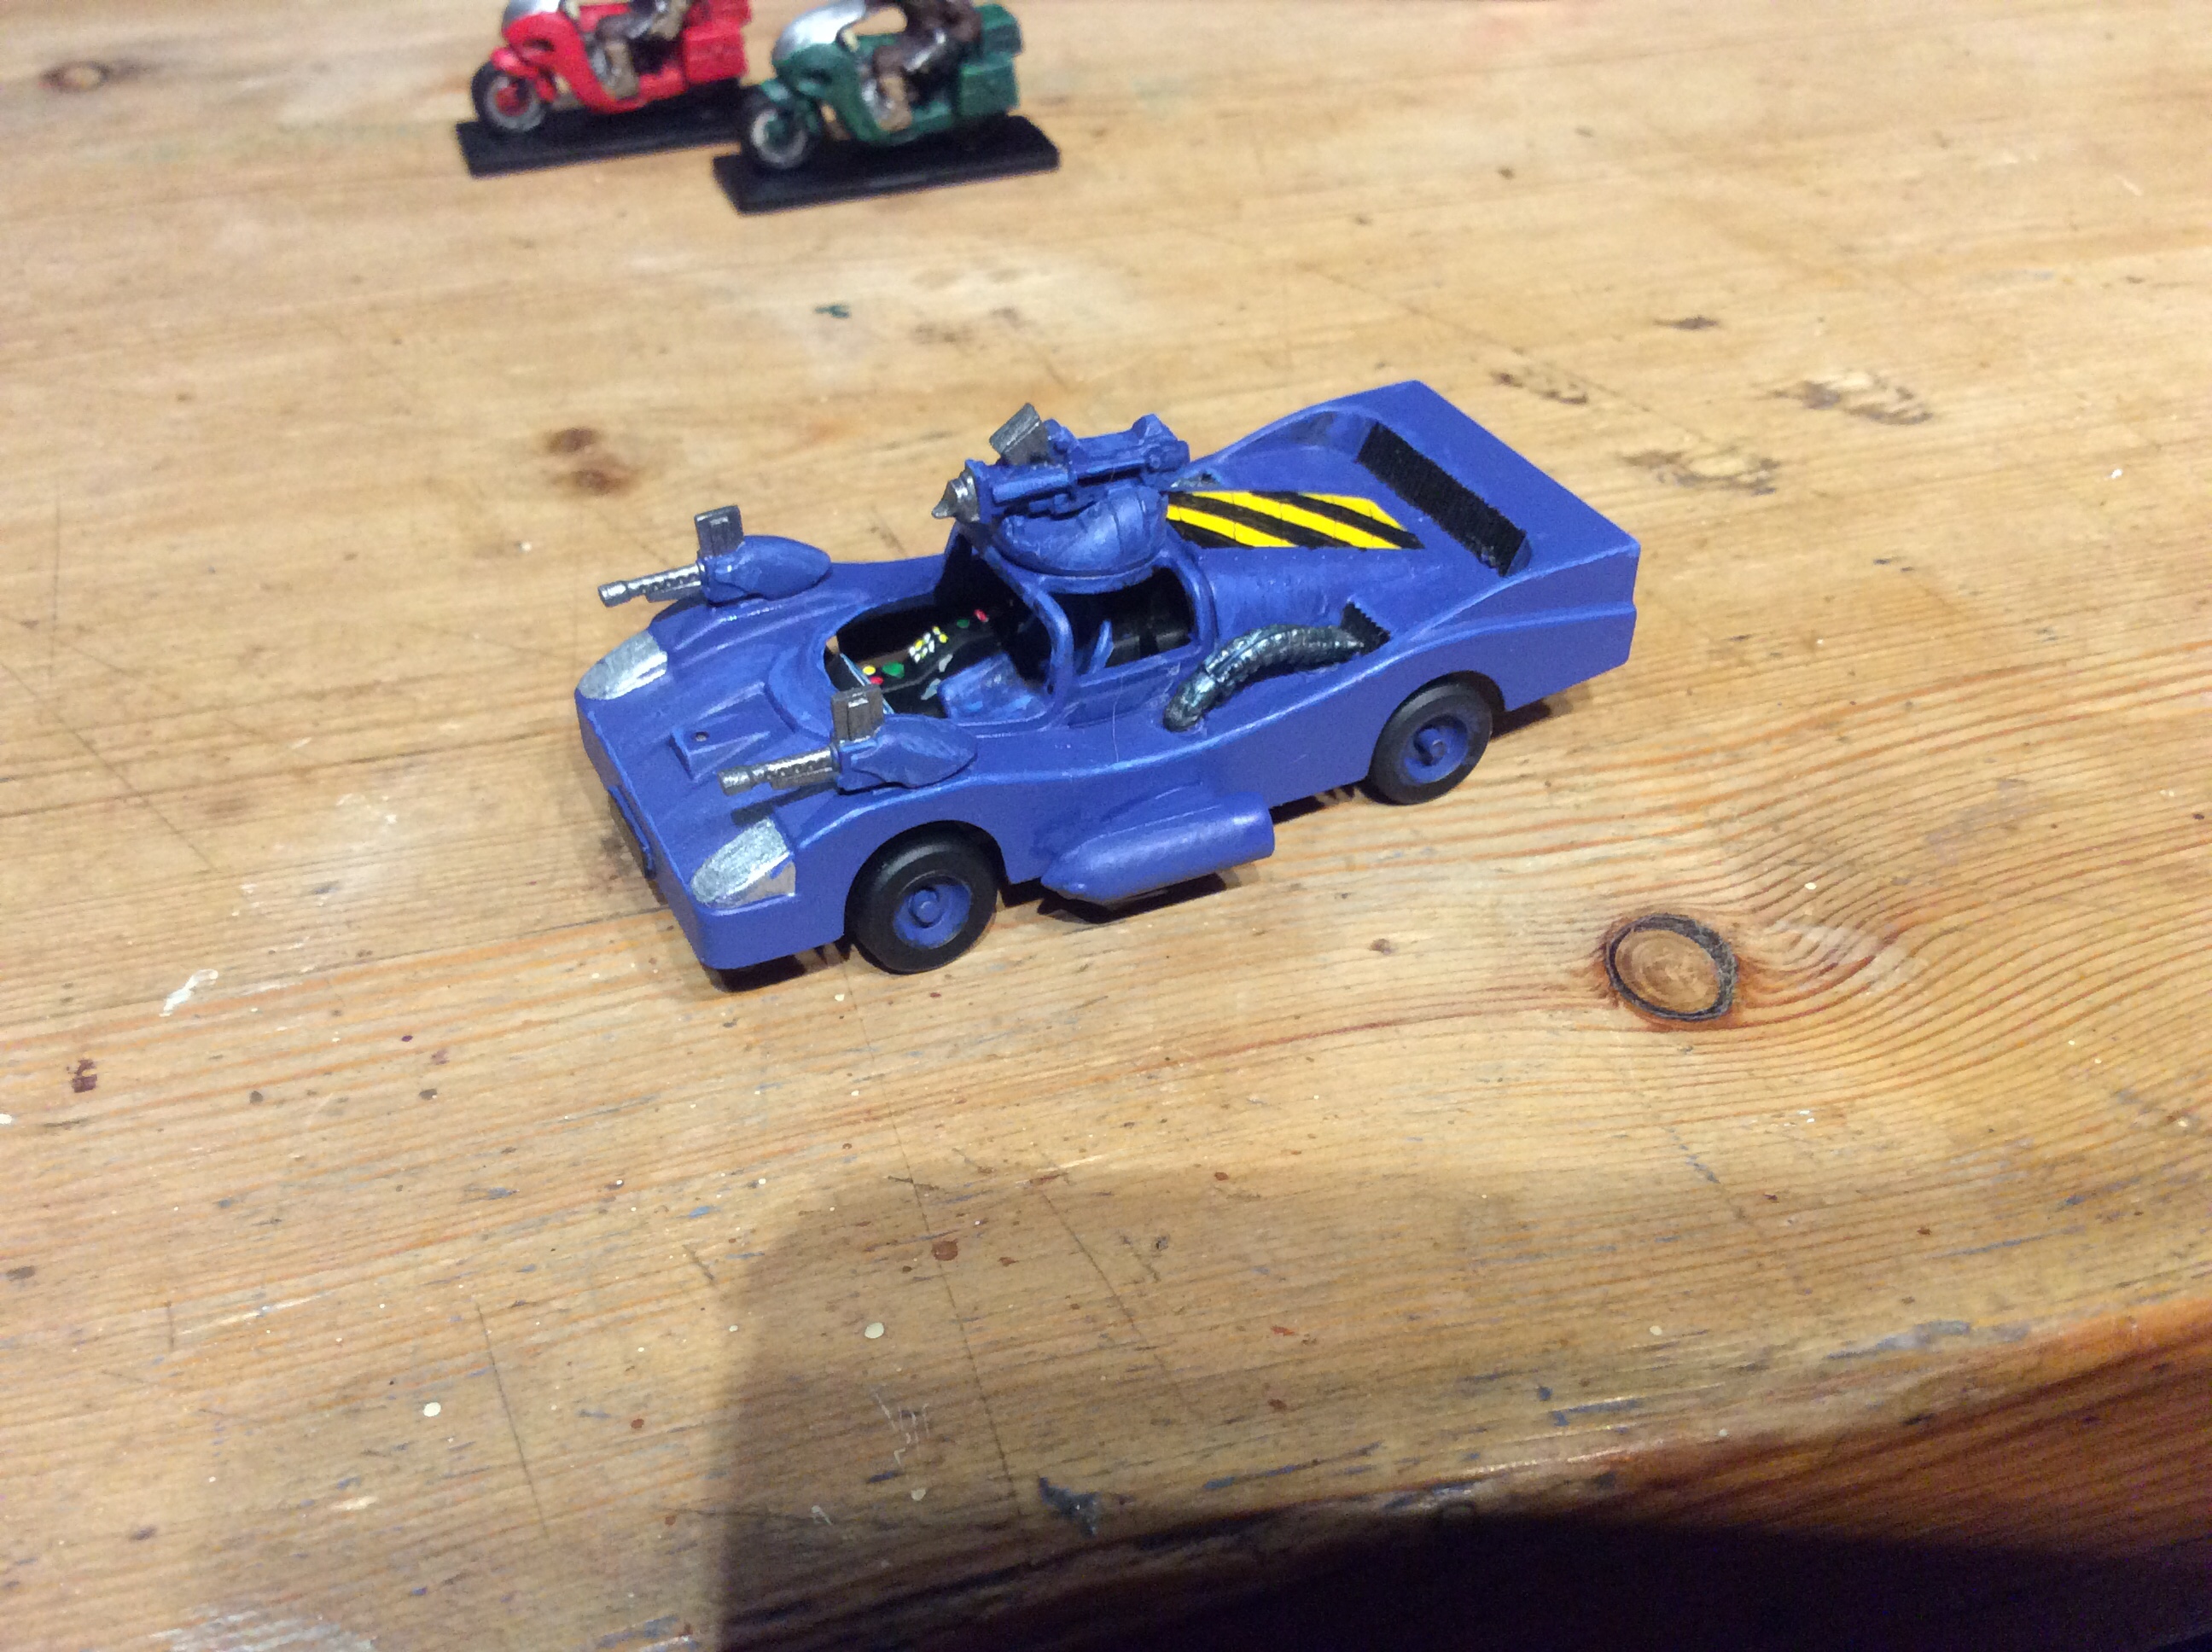
There were a whole host of weapon sprues available but I kept it to two forward facing guns for the Marauder and then three for the Interceptor (one in a turret).

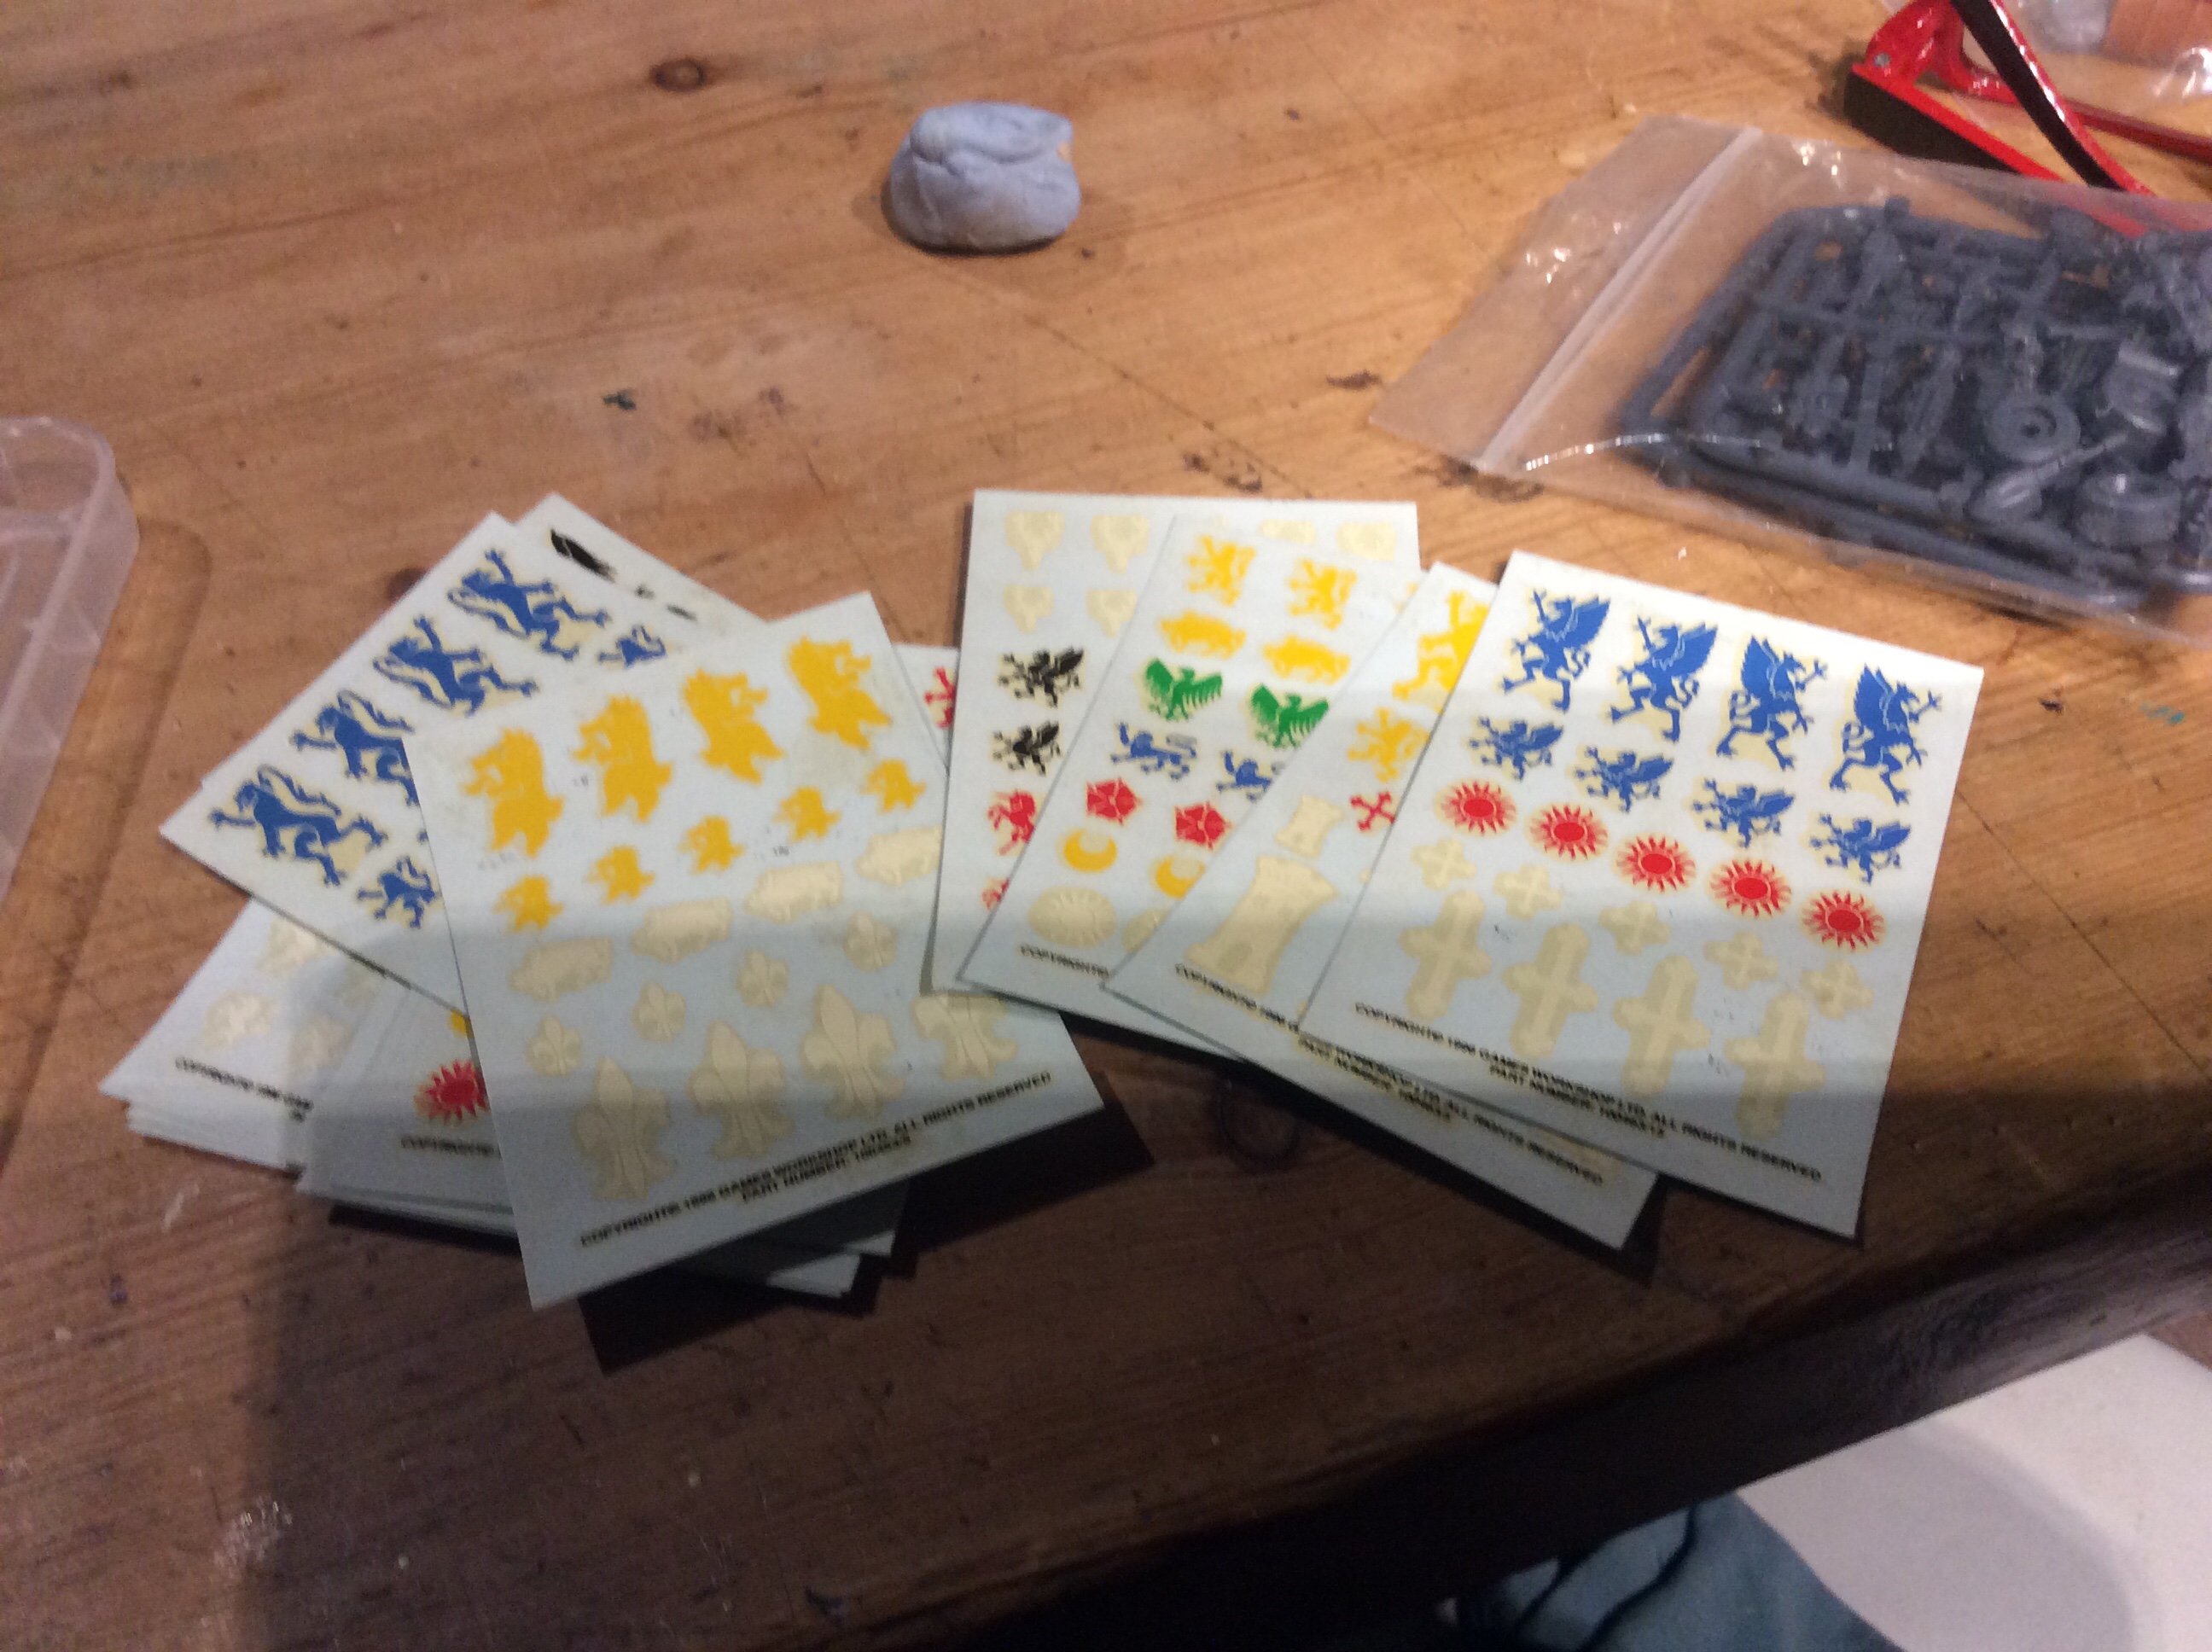
I was lucky to be given some spare waterslide transfers for the interceptor, one had hornet on it which is appropriate as I had decided to paint Yellow and Black onto the rear of the car. The Marauder transfer came from an ancient GW Brettonian sheet of shield designs.

So how do I feel it went…

I am pleased to get them to where they are, I probably (or definitely) spent more time on these than I would normally. I would like to think it was because I was wanting to try and improve and not because it was a ‘challenge’… I know I thinned the paint a lot more and put lots of layers on (something I wouldn’t normally do with vehicles). Adding all the extras is something new too. I deliberately went out and bought extra bits and bobs, jerry cans and oil drums etc, not to mention drivers and people on foot. Maybe I was enthused by how well I thought they were looking!

When I will get to paint the other two cars and bikes is anyone’s guess, but my mate and I both have the ‘Atomic Highway’ Roleplay game so maybe they will get painted up for that. Either that or get booted onto eBay to help fund the 3D printer pot.

My December’s challenge is going to be a pile of 28mm Heroes from my Flintloque stash.

I  started on the Ghoul officer, but have nearly finished him before December…

img_5904

Luckily I have plenty more to keep me going…. one day I might get to finish my Mongols.

Dark Future… the Final Countdown

Nearly there….

I have added various bits from a WW2 Char B to the renegade as well as a supercharger to the Interceptor (can’t remember what it was on the tank)…

I added some chain to the front of the Renegade as well as a hefty aerial, a rail and some metal gubbins on the roof.

The waterslide transfers gave me a nice vehicle number as well as a suitable name… how appropriate was the name considering I had painted the back yellow and black.

The boar came from some old Brettonian stuff I had or rather still have…11 sheets of various heraldic icons.

Tomorrow I will add some bags and Jerry cans to the Renegade.

Dark Future… now with drivers

Hurrah my drivers arrived!

They fit perfectly in the cars.

The other bits and bobs are ideal too…

I painted a couple of drivers up and got them glued into the cars.

I glued the canopy into the interceptor, I really cannot remember it being a slight yellow colour, maybe it hasn’t aged that well.

The other good news is that I found a pile of 20mm tank spruces, with the odd bit of unused tank on them. Hopefully I will find something useful (There is already some nice chain and a radio aerial visible)…

I will get the guns onto the renegade tomorrow and any other bits and bobs from the metal equipment (a couple of Jerry cans are going on the side of the car at the very least).

The second Renegade is going to have mesh inserts to cover the cockpit… well it will when I can find it.

Dark Future…Motorcycle’s Finished

Managed to get these finished today…

My little boy turns 8 tomorrow but as it is a school day we had presents and birthday meal today. I am surprised I managed to do anything. Full of food and been out in the fresh air… absolutely zonked out!

I also glued the rocket launchers onto the interceptor and gave them a quick coat of blue.

My eldest made a chocolate layer birthday cake, but actually used my rotating cake stand for an actual cake. That is a first, it is normally used for airbrushing stuff!

It was an extremely yummy cake, so I might just let her off (well she did ask to use it).

This afternoon’s shenanigans were once again in glorious weather.

The woods looked amazing with the late afternoon sun coming through the trees.

And then there was a great sunset as we were driving around killing time before going to Frankie’s Fish and Chip shop (one of the best, if not the best in Scotland – well they have won so many awards now I can’t remember where they stand).

Tomorrow I will have a think about what colour asphalt to do for the bikes.

Dark Future… Motorcycles

I started on a couple of the bikes,

The one thing about the bikes is they aren’t really what you would expect for a Wasteland bike gang. These are a bit more Van Saar than Ratskin Renegades as a Necromunda analogy.

You can tell their age, if one compared the plastics now to these from then, there is absolutely no contest. You can’t really tell on the photos, but the gun butt goes right across the body of the rider. I will paint them all up on bright coloured bikes, but with the same dark coloured leathers.

My drivers have been dispatched, which means I can get the cars finished soon. The piping on the interceptor was glued down and given it a blue wash. I am considering adding the missile launchers on backwards to the side holes just visible above the green bike. These would become either boosters or smoke dispensers. As the end of the hose is directly above the hole it might work….🤔

What else have I been up to…

As I have recently got back into playing Fallout 4, I thought I would share one of my favourite songs on Diamond City Radio…

https://youtu.be/FNJ5EuU1hYU

I have a new idea for a new book…

Murder on the Tringaloongahulahumbele Express!

It was a rather nice evening yesterday…

Tonight wasn’t too bad either…

Sadly the tablet wasn’t able to cope with the differing light levels…the distant hills were a lot more visible to the naked eye.

Dark Future…Interceptor Weapon System

Weapons glued in place

Pipe thingies part painted and shoved on to see what they look like.

Still a bit of work to go, but over the hump now. Hopefully the drivers will arrive next week and then I can get them in, the cockpit canopy on and everything glued together.

I am going to see if anyone has any water slide transfers so that I can put a number on the side.

I did consider some of these…

However they are all a bit too big ☹️! somewhere I have a one from a Cadian Walker it has a nice selection of numerals and skulls for that matter. But can I find it? Can I bugger!

Dark Future…Further Painting

I got in late tonight

so only managed to do a smidge on these.

I decided to redo the green and then went a bit wild adding dots. It looks better at a distance than an extreme close up. Mr Skull got some superglue onto it and then I dropped it on the floor. Only took me 5 minutes to find it. It is very, very small!

I ordered some drivers from Elheim as well as some armour plates and Jerry cans etc.

We shall see how they go into the vehicles.

Dark Future… Messing About With Greenstuff

No painting tonight…

But I did have a play about with weapon configuration…

I felt the lighter guns were more streamlined on the right. The top of the interceptor will be a turret, containing either a chain gun or a 40mm grenade launcher.

The skeleton volunteered his head to act as a hood ornament, which was jolly decent of him 😁.

Whilst having a mooch for things I came across a nice little oil drum, this fits these cars really well. So I sought out my reusable moulding stuff and made a simple mould. This stuff has been used with Milliput and unfortunately has left a nasty residue. And over time this has worked into the material. It still seems to work though.

Now a sensible person would have put it into the mould with the mould line in line with the two halves…. sensible and me was discussed yesterday…this is a proof of concept test run….that is my excuse and I am sticking to it.

Finally the Greenstuff tool was hauled out and put to use to make the following…

I am not sure what it is meant to be but it fills in a couple of holes. The mould seems to have worked too 😁.

I am out working on internet safety tomorrow evening so I am not sure how far I will get on these.

Dark Future, the Interiors

Made a bit of a start painting the cockpits on the cars. Brown seats for the buggy types and coloured for the Interceptors.

I also added lots of bright buttons and lights as well as trying some dashboards…

I actually only needed to paint the engines on two. They can only be seen on the buggies!

I have already started on a blue interceptor to match the seat cover 😉. Too be honest I am a bit worried as to what these will come out like. Edge highlighting has never been my forte. More like my minus forty. But it is something different. I will have a mooch online to see what inspiration I can get.

I only wish I had drivers to add into them. The original drivers had the steering wheel moulded onto them. These will look a bit weird without them.

Having had a look I can get some from Ramshackle games, problem is I only need 4 drivers, they have a good deal on their stuff but do I pay £20 for stuff I will never use?

I will have to have a think on that.