Desert Dwelling Update.

The two story house just finished, but as I said in the previous post the ground floor is the same.

Here we have a comparison of the two. 50% and 60% of the full size.

I am going to go with the 50% size as I think it will look the best.

Here we have the two story version…

Unfortunately I printed the wrong size upper roof. I say unfortunately as although printing a new one should be Easy Peasy, it sadly is not as one of my dear, dear children have totally destroyed the laptop screen. Therefore we will have to somehow get it to Unst and then see if he can fix it before he can somehow get it back to us!

I can now only print the things on my micro SD card. Bugger!

Desert Dwelling II

Well I down sized a building to 50% full size and it came out thus:

This is a different one to the first, but is another from the ones purchased from Terrain4Print.

If we look at the first print it looks like this…

It is quite big compared to the MKIII.

And then side by side…

To be honest I think the smaller of the two still looks fine, whereas the first one printed looks a bit on the big side.

I am printing off a two story house, but the base is the same as the one with the stairs.

Once it is done I will do a further comparison shot between the two. Let me know what you think so far.

North African Buildings

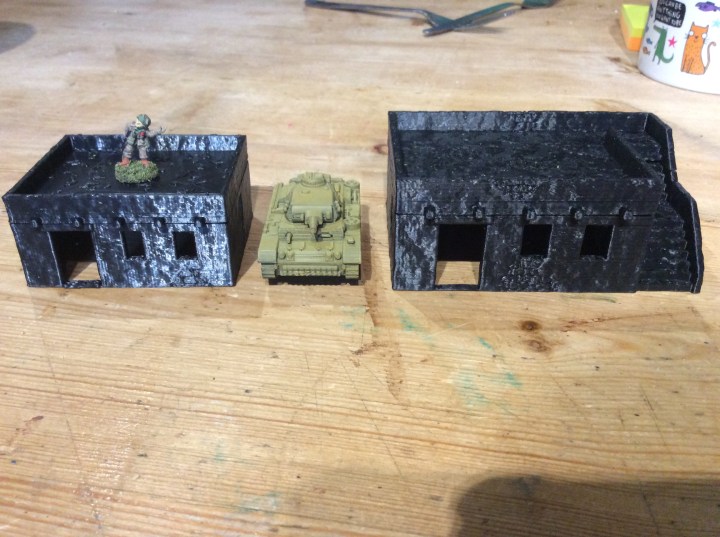
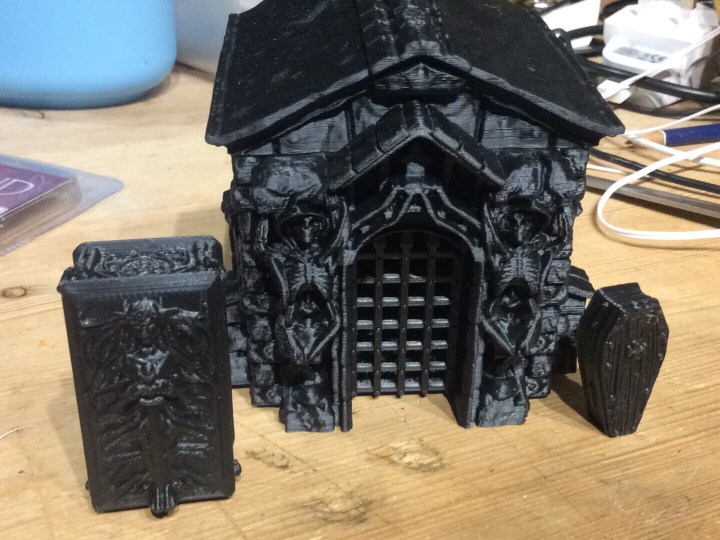
I decided to have a go printing some buildings.Both of these came from Thingiverse.

The one on the left is from Jonnybrokenbones, I have this one and a two story one from him too.

The one on the right is a free sample from a set by Terrain4Print:

https://www.wargamevault.com/product/216710/Modular-arabic-village?manufacturers_id=11761

Now what can we say about them. Both of the took about two and a half hours.

The one from Jonny is a nice simple design with a roof that drops in. It doesn’t have a door (it is from the other house) I just stood one up against the hole to see what it looked like. It has a full base too. This one is designed for 15mm miniatures.

The other one by Terrain 4 Print was a reduced sized from 28mm. I dropped it down to 60% size. This one is a hollow shell with a complete separate roof just below the exposed beams.

It comes with separate doors and window shutters. In the free one it comes with a domed roof too. This one is really well detailed. It can’t be seen that well in the basic black PLA, but the render has ‘fallen off’ in a few places. The roof is also textured.

I checked up on the bought version…Basically 6 different buildings and a couple of separate walls (however if they are mirrored then it takes it up to 12).

Now if I were a total skinflint I could make 4 ‘free’ buildings from this set, plus another few free ones from Thingiverse. But you know what, of the two I really do like the one from Terrain4Print. A lot of work has gone into the design of these buildings and it only seems fair that I help out the designer. I will purchase the set of six and tip the other designer from Thingiverse.

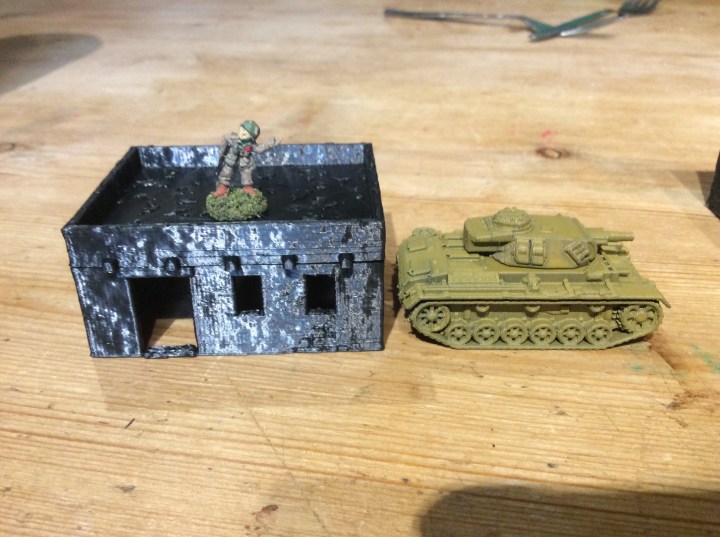
I want these for a desert themed board for ‘What a Tanker’ If you look at the pic below you can see how big the buildings are compared to both a tank and a 15mm figure.

I reckon I will reduce the size down a bit more to 50% as the buildings look just a bit too big still.

Painting Things…

I actually managed to paint things this evening…

I got half the cloaks done on the elves as well as pouches and their base colours on the faces.

I then managed to get some paint on the mausoleum… still a bit to go on it but definitely getting there.

The mech also got some work done on it, he wanted it grey with a blue canopy… the red missiles come next.

And finally… not painted, but a bit smaller than before.

I reckon he still looks quite impressive even at 75% size.

He here is feeling like he is part of a hive…

I reckon a dozen or so more will be in order for our up and coming RPG. I just have to find some hopper bugs and a Tanker……

3D Printer Updates…

So the printer has been running quite a bit this afternoon and evening…

I redid the heroes for the game… much better this time round… but then again they took 5 hours plus to print. I still managed to snap the spear off the same one again! I reckon the PLA just isn’t strong enough. I will drill it out and put in a wire spear or something similar.

This is still without the specific miniature profile for the slicer.

The other thing I made was a vat of bubbling something or other.

It isn’t exactly the largest thing to hide behind, but I reckon I could double the size. This size took an hour and a half to print.

I also made a start on printing the game tiles….

Still a very long way to go. I fished my Dark green rattle can out of my shed and have brought it into the house to warm up a bit. I will give all the fields etc a spray with it then get some variation onto them. Part of me wonders about adding flock to them, but I am worried it might look weird. On the upside I can print a tile off and give it a go…..

On the plate now are some 40k style ammo boxes with separate lids… They should be done in not much over an hour.

Weird space plants II

Shock, horror, I actually managed to get this off the build plate without anything snapping or me stabbing myself with a metal scraper 😉

Unfortunately I can’t remember how long it took to print, somewhere around 2 hours thirty or thereabouts.

I was thinking about playing with the scale and printing some bigger and smaller versions, then breaking them up a bit.

January’s Community Challenge

January’s challenge was terrain, so I decided to give some a go. I was rather pleased with the result, however I could have done more if I hadn’t become rather lethargic and lacked motivation.

But anyway I managed to get from the raw squirty foam to a few pieces of terrain.

As I had a bucket load of resin gravestones I decided on a graveyard theme. Rather than a flat graveyard I wanted something a little more dramatic.

I was pleased with how the ‘grave hill’ came out.

I then did some smaller hillocks using the off cuts from the foam. These were originally going to be covered in graves too, however I decided that the pieces would be more flexible if I avoided the gravestones.

I also made a start on another hill, but ran out time…

One of my other plans was to get this completed in January…

I did manage to print it in time, but it was meant to be based and painted too…

I will endeavour to get the last two finished sometime soon.

Scatter (brained)

Well I had a whole month to make terrain and instead of doing everything I was going to do, I basically didn’t. Getting the 3D printer in and working properly didn’t really help but it is a bit of a naff excuse as the prints take hours to finish. I suppose I just lost a bit of motivation brought about in part by the realisation that I have to store everything somewhere.

That Not withstanding I did manage to finish the hillocks.

The biggest is about 15cm long by about 13cm wide the other two are roughly 15×10

I also got some base grass on the open grave hill…

This is bigger, sitting at 16 x 19 cm. it is about an 3cm high at the cliff end. Hopefully I will get it finished tomorrow a bit late for January’s community challenge, but it will definitely fit into February’s neglected challenge as it sat ignored for a good while.

The last piece of terrain I made a start on was my mausoleum. This came off the 3D printer this morning. It took 8 hours 40 minutes to print. The two 32mm figures show the scale of it.

It is pretty close to a 6cm cube with sticky out bits (I am tired and can’t think of the correct word!)

I am printing the roof just now. It is an hour and a half into a three hour print. Once this is done I will print the iron door and the sarcophagus for the interior. The coffin in the open grave sits in the sarcophagus. I can’t remember how much the above cost PLA wise, once the whole thing is finished I will price it up.

I will get it all painted up and put on a small base.

Graveyard Scatter…The Return

I managed to get a bit more done on the scatter terrain this evening.

I got the small hill painted brown..

Still the cliff face to paint, but getting there. The one thing I forgot to do was the spoil heap from the hole. I will see what I can come up with tomorrow.

I also managed to get some flock on the other three bits…

Still some clump foliage and tufts to add.

My 3D printer is working away on my longest print yet. I decided to get the Mausoleum printed. The walls will take over 7 hours with the roof taking another 3.

I reckon it will be done at about 03.30 tomorrow.

I was supposed to be traveling to the island of Yell tomorrow morning but as the temperature has dropped to at least -6 and as the gritters were off work today due to Up Helly Ah then I seriously doubt I will get out.

What is Up Helly Ah? Well it is Shetland’s main fire festival, supposedly the biggest in Europe. You can find out more about it here: https://www.shetland.org/things/events/up-helly-aa/lerwick-up-helly-aa

It does look pretty impressive…

Taken from Uphellyah.org

Guess What…. Not 3D Printed

I actually did something for my Graveyard… yes I really did. Look photographic proof!

I went for the open grave look. I decided that the original three scatter pieces were going to become just lumps and bumps as opposed to graveyard related. I decided upon this course of action as the graveyard would suit 28mm post 1700 games. Not much use when I have a lot of 10 and 15mm miniatures too. They will still be finished in the same flock as the large graveyard but will be minus the Gravestones.

I did however do some printing 😉

I did the missing wheel for the water cart.

I thought I might as well add a couple more as wheels are always handy

Oh and as I am writing this the printer is chuntering away making me some more barrels (the ones above), a couple of coffins, one open, one closed as well as a treasure chest too. I am still toying with putting the open coffin propped up against the end of the open grave…

Tomorrow I will get the terrain flocked and the other bit painted. Thankfully I am off tomorrow so hopefully I can get something done on them.