Stamps Again’

I tried out a stamp on foam board. Sadly it isn’t Dollar tree stuff. This the paper won’t come of style. Sadly I couldn’t find any black or grey card to test it on. By the looks of it, it does work well in the table 🤪.

There might be something in this… However I am not really sure what I would use them for. A few things I have learned from this is to make sure the paint goes on thick enough to leave a mark. I am using extra thick paint, I might see how a thinned down version works.

It looks better if there are no large splodges of colour. I tried colouring individual stones, but to be honest it doesn’t really work.

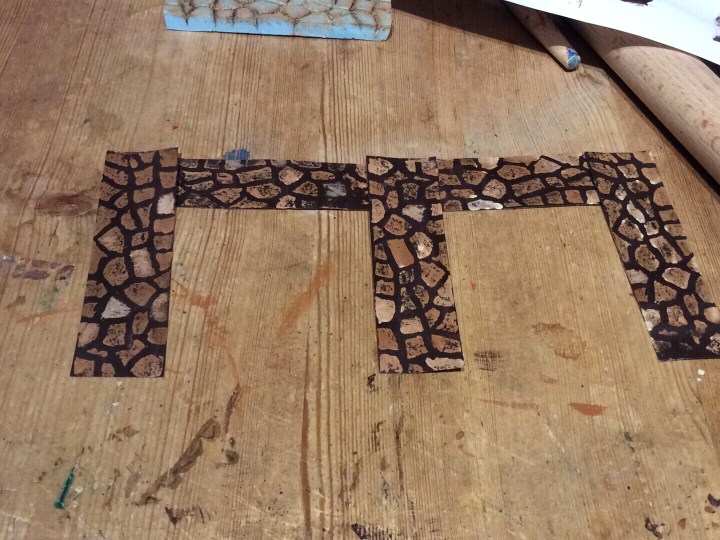
I painted a dark background and to be honest it looks much better.👍

I am pleased with the results so far.

Thanks DMScotty!

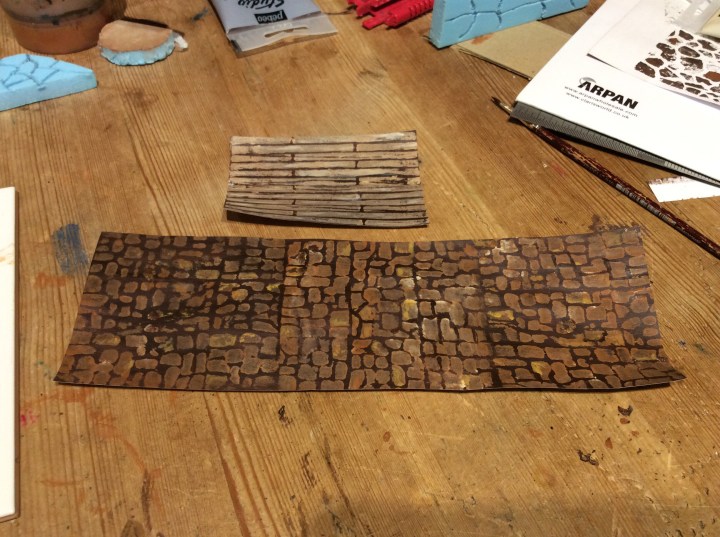
I blasted off another stamp which can be seen at the top of the photo below.

The advantages of the 10mm blue foam is that it is waterproof and can be washed under the tap. It is a bit sturdier too being twice the thickness of the foam board. It also has the advantage of not having to have the paper removed.

The advantage of the foam board is that I can get it locally, it is easier to put even pressure on too.

I will have to make a 3×3 tile and compare the two types.

I do particularly like the planks.

Two Minute Craft

As work has been hectic of late and I just about have time to eat some lunch I decided to do something speedy.

Basically some more potion bottles like the ones on the right above.

Not quite sure what I am going to do with them all, but I am sure I will come up with something 🙂


Library in the making

After watching a YouTube video on making books, I decided to have a try.

basically I used 2 types of card; a thicker and a thinner piece.

img_3558

I cut about a cm wide length of thick card and about a 12 -13mm length of thin card. I also made some bigger and smaller books by simply increasing and reducing the size of the card cut.

I cut two rectangles of the ticker card and then stuck them together. These were, in turn, glued to the end of the thin card strip. I made sure I had a little border of thin card around the edge.

Once this was dry I folded over the extra length of thin card and glued in place. It was simply a case of cutting off the extra length to match the first bit.

I did try experimenting with a book mark by placing a piece of post it note between the two thicker pieces, but I made it a bit wide and it just looked wrong.

I left it all to dry and then painted the  pages in bone white (basically cream) and then the covers in various muted colours.

The open book followed a similar principal but in this case the pieces of thicker card were glued side by side with a small gap in between them.

img_3567

I cut a piece of post it note to the same width as the thicker card.

I added the extra pages by adding glue to the gap and pushing it in with a cocktail stick. in this case I added a second piece (making sure it was slightly longer to allow for the squishing into the gap)

img_3568

Basically paint as before.

I used a ultra fine sharpie to add writing by doing little scribbles.

The idea came from:

Gareth has some really good simple ideas (mainly for D&D, but to be honest it can be used for anything mini wise)

Vanessa at the Crafting Muse is another fave…. Well worth checking them out. (The video below is my next piece 🙂 )

Lunchtime Treasure Tokens

I made a start on these today.

img_3556

apologies for the naff photo.

On the whole they are painted in washes apart from the metallics. They still need a bit doing to them but I am happy with them so far.

Later on tonight I will get them highlighted and based up. As they are a wash over plaster (albeit a very hard plaster) I will need to get them varnished to stop them chipping.

Treasure Tokens

Frostgrave is all about treasure.

The weather this morning was rather rubbish

After sorting out the horses, I only went out again to fill up the bird feeders.

So, with the yucky weather, I decided I would have a rootle through my bits an pieces to come up with some treasure tokens that would look better than the mdf disks used in our first game.

I used a pile of my hurst arts bits and pieces on an mdf base.

We have at the back left…

Crystal ball and mysterious machinery switch

A pile of coins

A lump of masonry which will have some form of weapon on it.

A mysterious sack

A gargoyle and pile of coins

Coins leaking out of a damaged barrel

A treasure chest

A stone skull which will have something on or near it. Might be a little bag or a book/scroll

A barrel and a sack

A strange device on a lump of masonry

And a large chest with a couple of barrels (this will be used more as a line of sight blocker than a treasure token – but in reality I may need a special token and this would suit)

each person places 3 tokens so I have enough there for a 3 player game 🙂

Just got to paint them all up.

Ruins

img_3504

This is another Cardstock building from Dave Graffam. I still have to edge it in a grey Sharpie. Sitting elsewhere is another one with a different stone pattern on the outside and bleached wood on the inside. It also has a chimney 🙂

I was about to go out and get MDF ruins and indeed bought a Black Ops mdf building as a starter. however I have come tho the conclusion.

Firstly the card is a whole lot cheaper. I got the above for $3.95, However it has multiple layers so the cost of 3.95 can get me at least 4 different models. Basically it gives me this amount of variation:

  • Stone walls
  • Wood walls (exterior and/or interior)
  • Stone corners
  • Stone foundation
  • Brick walls
  • Plaster walls
  • Beams
  • Several window and door positions
  • Flagstone floor
  • Stone floor
  • Wood floor
  • 4 layers of debris
  • 2 chimney positions (or none at all)

Now to be fair, I have to factor in print costs, which I am frankly not sure about. But I have found a quote from Ryman for 86p per colour sheet on 160gsm card. So for the building above £3.44 multiplied by 4 will give me a total cost of £17.66 including purchase of the pdf.

Now my dark ops mdf ruin is £16.00 plus £3.50 postage. I still have to build and paint it.

An equivalent sized ruin from Dave is 5 sheets with roughly the same purchase cost.

The MDF is a lot more sturdy, but both it and the card can warp if they get damp, and both don’t do very well if they are dropped and stood on ….I know from experience.

I have however cardstock buildings that are over 10 years old.

Dark ops mdf is really good as they design their pieces to avoid any of the gaps in the walls and roofs where the bits fit together. And to be honest their walls are a bit better in scale.

This is one of my earlier ones:

Three sheets of card from what I remember.

Dave Graffam Ruined Building

Dave Graffam Model’s Rock!

I have had a pile of Dave’s card models for a while, so as I bought Frostgrave I thought it would be good to do up some more of the buildings. These will also work really well for my Flintloque games too.

I got mine from RPG Now, but the site below is Dave’s own

http://www.davesgames.net/


I ran a piece of acetate through my printer to get the leaded windows.

To be honest I messed up this kit a fair bit. I forgot to join the two walls together before I stuck them down, this meant that I have had to glue the boxes down onto the wall to support the the corner not to mention adding one to the wall.  I will put one on the other wall to support the joint to the base too, because being the pillock that I am I cut of the base supports too!

All in all this is a really nice kit. I would advise actually reading the instructions which are very comprehensive, unlike me. I had forgotten to print them off and though how hard can it be – thereupon lies the problem :). I  have a number of others to build so I will hopefully learn from my mistakes.

I can make my own ruined buildings out of blue foam etc, but with this costing  $2.95 it doesn’t really seem worth it. I got another three ruined buildings in this purchase, one each with a number of skins so I can have quite a few buildings from the 4 sets.

I have a couple of these with accessible interiors as well as a number of others…http://www.davesgames.net/catalog-fantasy-accessible-interiors.htm


Messing Around with Extruded Polystyrene

Was having a chat with my family last night and in the midst of these chats I doodled (is that the correct word for something 3D) this.

I have since added a small annex. I might add some more.

To be honest it was quite therapeutic. The thick black line is to ensure the bits go together properly. Really not sure what I am going to do with it…. make it a ruined broch, a small hut, or even a planticrub:

https://www.shetlanddialect.org.uk/john-j-grahams-shetland-dictionary.php?word=1825

in case you were wondering.😏😏😏