Finding a real Smuggler’s cave.

We had never heard about this 19th century smugglers cave even though living up here for 12 years. We found out about it today and set off on an expedition to find it.

We eventually did…

In the 19th century the fishermen didn’t own their own boats. The paid for them in the fish they caught. A friend of my wife has done some research and for every one boat registered another four were smuggling. The crews would go out in their sixareens to the fishing. This was a deadly job and a fair few tragedies happened around these shores. In July 1881 58 men were lost from Gloup when 10 boats foundered in an unexpected storm. Basically every able bodied man from the village was lost.

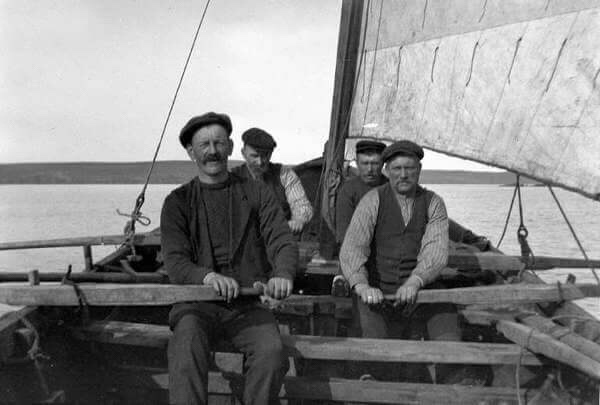
These clinker built boats would head out up to 40 miles off shore and then return. Some would stop off in Foula, an island off Shetland, sell or trade some of their fish for brandy and then head into their secret locations. They would Drop off the brandy and then head home. They would either return for it later or some of their accomplices would do it for them.

This cave was one such secret location. One end opens directly to the sea and is not visible from the nearby village of Hamnavoe. The other entrance is about 100 metres away and is well hidden amongst a jumble of rocks.

On the way back the kids just had to jump off every available rock…

We had an awesome afternoon out exploring somewhere around 7 miles from where we live.

A Great load of Crates

I love watching the crafting videos on YouTube. They are often on in the background whenever I am doing anything.

There are many very creative people out there. My Crates came about after watching Gareth over on DMG. He built a crate, which I thought was a cunning idea, and made my own version of it.

img_3826

A few weeks later DM Scotty showed an even easier way to make a crate – a wooden cube painted to look like a crate. I thought this was rather cunning so ordered a set of 10 x 20mm cubes and 10 x 25mm cubes to give it a go. The two sets cost about £5.50 with free postage. They came all the way from China with free postage (I still cannot work out how that is financially viable).

Anyway, move forward a few weeks. The dreaded flu struck and my various bits and pieces sat there. Whilst in the recovery phase I watched Dungeons and Gluesticks. John was making crates too (all three videos probably spanned 3 years).

John also used the basic wooden cube but instead of just painting it, he used a razor saw to cut grooves into the cube. He then added the cardstock around the sides. It did look rather good.

I decided to give his version a go last night.

img_3867

Mine are a bit rough and ready but they do indeed look like crates. I could probably use narrower strips of cardstock on the edges. However, seen on a table a metre away I don’t think it will really matter. I didn’t bother sawing into the sixth face of the cube as I am going to base a lot of them in groups to act as a line of sight blocker and/or cover.

I made another one today on my lunch break.

img_3869

They are indeed very easy to do; they take a bit of time but look the part and in my mind well worth the small amount of effort it takes to build them.


Below are links to the channels I mentioned above.

Gareth, Scotty and John

https://www.youtube.com/user/TheDMGinfo

https://www.youtube.com/user/theDMsCraft

https://www.youtube.com/channel/UCZvZvalRLgkGXmFTpHEJBiw

Another couple of channels I watch a lot are as follows:

Vannessa on the Crafting Muse https://www.youtube.com/channel/UC92IlSbAqZY-TQv5pa4V1nQ

Black Magic crafts https://www.youtube.com/channel/UC2Rlv-ug-mtnXuMwlpcqFgg

I have just started watching the following

Wyloch’s Craft https://www.youtube.com/channel/UCrKJd7jQ989DZvtf5C69mYA


Airbrushm

After nearly 5 weeks I switched on my airbrush for the first time.

Here we have a couple more Guard cavalry and a Ferach surgeon and a hussar Officer as well as Madame Boniface and Egor (they say he is a golem, but to me he is an Egor.

I purchased the airbrush primarily to undercoat figures and terrain. To be honest it took a little working out. For example you have to lift the dial to change pressure before turning it however the instructions don’t say that the name it and say turn to alter the pressure.

The back nut on the airbrush needed loosening a bit to get the paint to flow properly. But to be honest it took about 5 minutes to work everything out.

I deliberately purchased airbrush paint as I wanted to reduce the number of variables that I needed to work with straight off. There are loads of YouTube sessions showing how to make your own airbrush ready paint.

The temperature today is about 1.5 degrees and blowing a gale. Not good spray painting weather. The thing I loved about this airbrush was the control of it. I painted each one whilst holding onto the base. Yeah my glove got a bit of paint on it, but compared to a spray can? Hardly any at all!

The paint layer on the figures looks really smooth. So all in all I am a very happy person.

This is the one I bought. It isn’t a Badger or any of the other ‘top’ makes but it does what I want it to do and that is good enough for me.

https://www.ebay.co.uk/itm/COMPRESSOR-KIT-AIRBRUSHES-AIR-BRUSH-COMPRESSOR-AIRBRUSH-COMPRESSOR-KIT-132-128/370268372610?ssPageName=STRK%3AMEBIDX%3AIT&_trksid=p2057872.m2749.l2649

Still Ill

I havent so much as looked at my blog for a week due to having some horrible flu bug. I am sleeping on average 18 hours a day, haven’t eaten properly since Monday and am, to be honest, feeling a little glum 🙁

I have new toys in my airbrush and airbrush paints, new figures and all manner of fun things to do. Problem is I haven’t got the energy to do anything.

Stamps Again’

I tried out a stamp on foam board. Sadly it isn’t Dollar tree stuff. This the paper won’t come of style. Sadly I couldn’t find any black or grey card to test it on. By the looks of it, it does work well in the table 🤪.

There might be something in this… However I am not really sure what I would use them for. A few things I have learned from this is to make sure the paint goes on thick enough to leave a mark. I am using extra thick paint, I might see how a thinned down version works.

It looks better if there are no large splodges of colour. I tried colouring individual stones, but to be honest it doesn’t really work.

I painted a dark background and to be honest it looks much better.👍

I am pleased with the results so far.

Thanks DMScotty!

I blasted off another stamp which can be seen at the top of the photo below.

The advantages of the 10mm blue foam is that it is waterproof and can be washed under the tap. It is a bit sturdier too being twice the thickness of the foam board. It also has the advantage of not having to have the paper removed.

The advantage of the foam board is that I can get it locally, it is easier to put even pressure on too.

I will have to make a 3×3 tile and compare the two types.

I do particularly like the planks.

Tile Printing.

I had a bash at printing stone work. Not sure why, well apart from diverting my mind. I found my normal higher detail blue foam wall with lots of texture didn’t work (not in this picture)basically I make a wall out of it. I blasted off another rest tile out of scrap and it was much better. Initially I have used some 10mm blue foam. I have got some foam board so I might give that a go tomorrow on some black/grey card.

My blue foam walls normally look like this.

10mm skirmish Games

I do like my little stuff lots

I am a big fan of small scales and due to the size of my house small scale games are a lot easier as they take up less room.

I present a selection of pulp figures and a fantasy selection. These are all 10mm Pendraken figures.

I also can manage a bug hunt using marines and a strangely familiar xenomorph.

Dice Tower Part III

Managed to get some paint onto this thing.

Base coated black from a spray can (top done with a brush)

Layers of dry brushing from the black…

Chocolate brown (basically a tester can of house paint)

Additional layers of a tan mixed into the brown with more tan added as the layers went on.

Ivory mixed into the tan/brown mix.

I painted up the top separately

The white tube cap pretty much disappears inside the tube. I might add some Black around the rim to make sure it is completely hidden. (The two dry brush colours can be seen in the picture above).

The nearly finished tower…

Still the gratings to dry brush gun metal as well as flock around the base as well as get a green wash around the lower parts of the tower to simulate damp. I might even go so far as adding a climbing plant up the side.

Accidental Art

I now know how ancient sculptors made their sculptures. They squooshed up loads of marble plaster and Voila…instant sculpture.

I was cleaning out the r3mains of my filler and I noticed an arm. How wierd is that!

The Tower Part IIi

Well I managed a little more on the tower.

I was unsure what I wanted to do to add texture to the tower. I came up with lots of ideas, some a lot more time intensive than others did.

This ranged from cutting individual card stones to wrapping the whole thing in tin foil.  I remembered my old GW building Wargames Terrain book.

518O2uHVF4L._AC_UL320_SR228,320_

I had a mooch in there as I remembered they had a round tower. They had added filler to theirs. I therefore decided to do something similar. I mixed filler, PVA and sand together and brushed this on with a 2 cm brush. Once on I stippled it to get some form of rough texture.

img_3622

It will get a light sand to knock off any of the peaks that may snap and I may actually sand off some of the texture on the individual stones to make them stand out a bit.

I am using the plastic end cap to attach the top to the walls. This was superglued and hot glued into place. This allows it to be removed if needs be.

Next stage…Painting the thing.